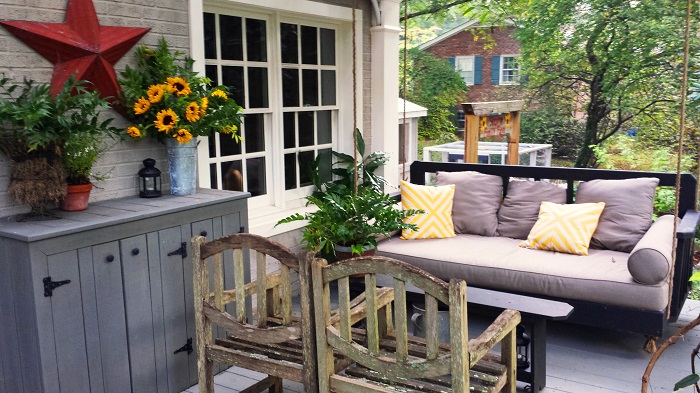
The Hanging Daybed – a Perfect Spot to Read or Snooze
So Britt has started this series of posts on redeeming your ground by reading outside; however, as she suggested last week…I’m not much of a reader. I know I should be for so many reasons, but I’m just not. Sorry. That said, I redeem my ground in different ways…and one of those ways is to create said wonderful outdoor spaces where Britt and our girls can enjoy their hours of reading. One of the favorite spots that I’ve created…and Britt mentioned as being her favorite outdoor napping…err, reading spot…is the hanging daybed on our pergola just outside our back door.
Ours is a very simple design…but it definitely does the trick. Here are a few tips you might find helpful if you’re thinking of building your own:
- Size:
- It’s about the size of a twin bed…big enough for all of 4 of us to get on it a la Willy Wonka’s grandparents.
- If you go too much smaller it will be more of a hanging bench…lacking its lounging appeal; and if you go much larger, it will just be a beast.
- Mattress & Cushions:
- Since our mattress was measured to fit the space, we had to get it custom-made. This was by far the most expensive aspect of the project. So if you can find an outdoor mattress & cover that’s a standard size, you’ll be much better off. In fact, if I were to do it again, I’d probably start with the mattress and build around it.
- That said, regardless of if you buy the mattress “off the rack” or have it custom-made, you’ll want to make sure to use materials that are designed to stay outside…as you’ll invariably forget to bring it in that 1 day that it pours! Believe me…I speak from experience!
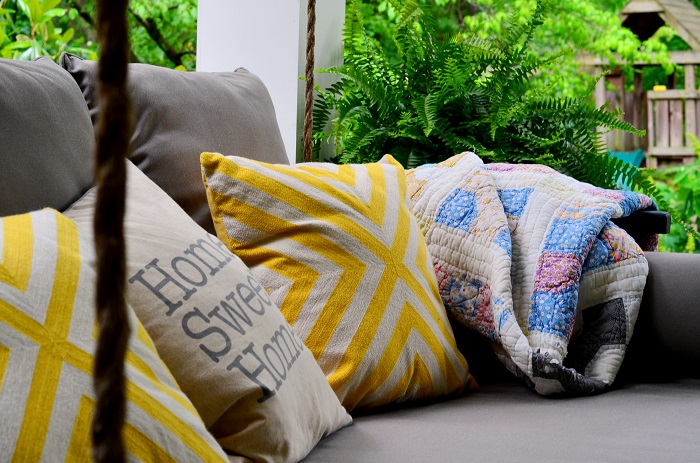
- We used densified dacron inserts for the mattress, the larger back cushions, and bolsters….then covered them in Sunbrella fabric. We’ve been very pleased. The Sunbrella fabric doesn’t fade or absorb water and the densified dacron inserts are designed so that whatever water gets through the fabric flows right out.
- Storage:
- Although we could leave the mattress and cushions outside more than we do, we usually bring them in when we’re not on the daybed. This is kind of a pain, but well worth it.
- Since you’ll need to move the mattress and cushions back and forth, I would suggest that you think through where you’ll store them when you’re not on the daybed. The mattress is a bit cumbersome to move on your own….and it takes up a lot of room – so the closer you can store the mattress to your daybed the better.
- We’ve solved that problem by having the mattress serve double-duty. When we’re not using it outside, we put it on the floor in our playroom for additional seating….which is right around the corner from your back door. And since we’re typically outside when the weather is nice (i.e., not watching TV), this hasn’t been a problem. Later this year, I plan on building a simple frame to put the mattress on inside to lift it off the ground. How’s that for being green…or whatever?!
- Construction & Hanging Method:
- It’s built with basic lumber from Home Depot:
- Platform: 2’x6’ base, 2’x2’ ledge (that the slats sit on) and 1’x6’s as slats
- Back & Sides: 2’x4’ frames with 2’x2’s as spindles
- It’s built with basic lumber from Home Depot:
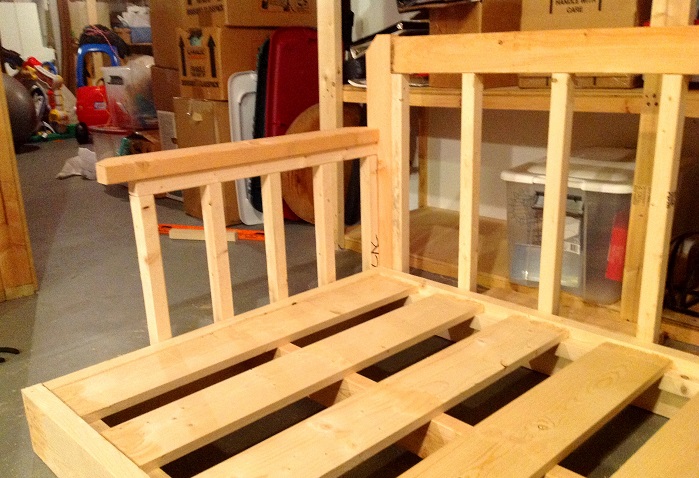
- I’m no craftsman…so I found a way to use all right-angles when putting it together.
- I painted it black to match our home’s doors and shutters – not wanting to draw any special attention to the daybed itself…using other outdoor pillows (from World Market) and plant material for added color and interest.
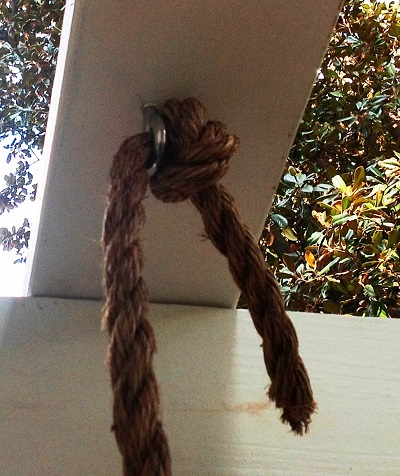 What I thought would be the most difficult thing to do – hanging it…ended up being quite easy:
- I simply drilled holes in the frame of the platform and screwed large eye bolts into 2’x6’s that I installed above and perpendicular to the pergola slats. The 2’x6’s provide additional support & allowed me to position the daybed where I needed to…moving the 2’x6’s in place above.
- Then I threaded Manila rope through the holes in the platform and eye bolts and tied a single knot at the end of each.
- To ensure that I tied the knots in the right places, I measured beforehand and placed painter’s tape where I wanted each knot to be. I thought I would have to correct things here and there, but it worked the first time. Woopwoop!
- Setting:
- Where you place your hanging daybed is critical – given that you’ll likely be reading & sleeping there…or hanging out with friends.
- Not only do you want it to be relatively close to your home and mattress storage (so that you’re more likely to use it), you also want to make sure it’s in a relatively shady spot, with soothing sounds…and ideally, where you can feel a nice breeze.
- As I’ve mentioned, ours is on our pergola…which is covered with Evergreen Clematis Armandii…so we’re always in the shade or dappled sunlight. For sound we have a single wind-chime (and I’m not much of a wind-chime fan, but I like it here)…and we’re not too far from the sounds of our softly clucking chickens. It really is the perfect spot…if I do say so myself.
So there you have what we’ve come up with for our hanging daybed. To give you a bit more inspiration, here are some pics of a few daybeds that inspired me.
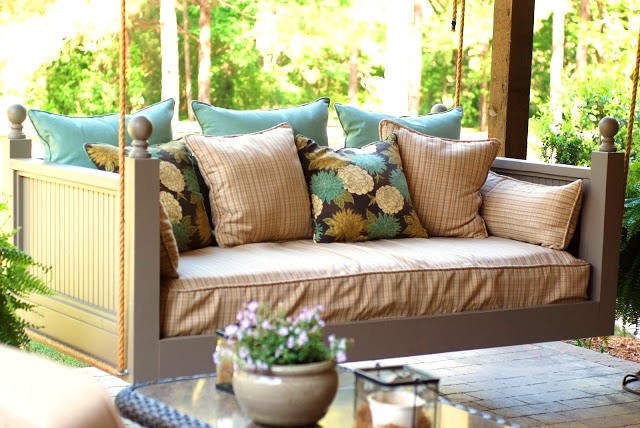
From KiwiWoodWerks.com.
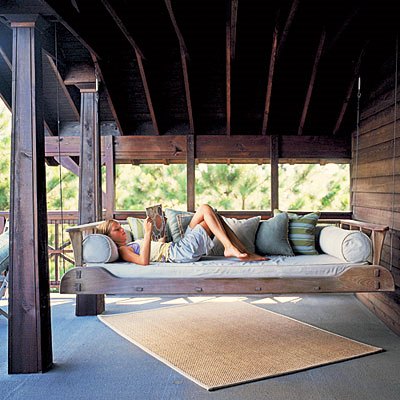
From CoastalLiving.com & HighGlossBlue.com.
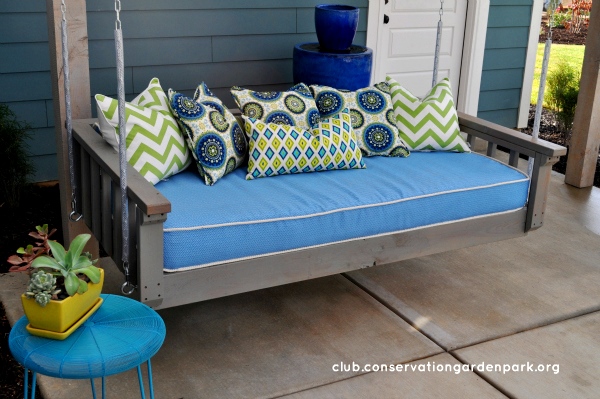
From http://club.conservationgardenpark.org/…with a GREAT set of instructions.
![]()
If you have a spot for a hanging daybed, I’d highly recommend your doing whatever it takes to have one of your own…build it or buy it. I’m certain you’ll be glad that you did.
Please let me know if you have any questions about our hanging daybed…I’d be glad to pass on whatever information that I can. Also, if you have a daybed, please share any details that you think others might find helpful.
Now I’m off to stack a few zzzz’s in ours…and not read!
Take care,

You may also enjoy these posts from RYG ...


If you're not already subscribed to RYG and want to get periodic updates, links to new posts & other ground redeeming info ... just enter your email address below. Easy as that!
I’ve got to get Kev to build one for us! I love them. Thanks for this instructional post!
Thanks Brandi…and Kev, with his skillz, would crank one of these out in no time! We love ours…just make sure you hang it in a shady spot…or plant some vines to grow over it. Makes a huge difference in how often you can enjoy it. Take care friend, D.
Hi! Where did you get the mattress custom made? Thanks! I love what you have created 🙂
Thanks Libby…we love our pergola/hanging daybed space. I’m not certain where you live, but if you live in the Atlanta area, we purchased the material at Forsyth Fabrics (http://forsythfabrics.com/) off of Huff Road between Howell Mill and Atlanta Rd./Marietta Street. We then gave our material to M. Southern Design Concepts in Norcross (http://www.macksoutherndesign.com/, (770) 729-0990). They had all the appropriate materials for the mattress itself, as well as for the 3 large pillows in the back and the 2 bolsters. I would highly recommend them…great to work with…clearly knew what they were doing and although not cheap…I think you got the value you would be looking for. I hope this helps. Please let me know if you need anything else or have any other questions. Take care, D.
What size diameter rope did you use?
Bill…thanks for your question. I used 3/4″ rope. Initially…as shown on the post…I used Manila rope, mainly because I liked the look of it. However, I have since replaced it with nylon rope. It’s a bright white (which I’m not too fond of), but it’s a lot longer lasting. If you search for it, you may also find nylon rope in other colors. I hope this helps. Let me know if you have any other questions. Take care, Doug