Container Gardening 101…a la Helen Weis with Unique by Design
Oh the signs of Spring! And one of the surest signs of spring for me has to be the overwhelmed, bug-eyed expressions that I see on peoples’ faces in big box stores or plant nurseries…not knowing what to buy from the vast selection of flowers to choose from. I know. I’m right there with you.
And things get even more overwhelming when you try to figure out what plants to pull together for a container. So as I’ve done for a few years now, I wanted to share with you the post I did with container gardening expert, Helen Weis with Unique by Design.
This container gardening 101 post is one of the most popular post we’ve done on RYGblog. On it Helen spells out all you need to know to create your very own container garden masterpiece…while giving you license to have fun and be creative. And hopefully it will help you be a tad less overwhelmed when making plant selections this spring. Enjoy!
![]()
I’ve probably gotten more requests to do a post on container gardening than anything else…and with the entrance of spring when everyone is trying to fluff things up, there’s probably no better time to do it than now. Today’s post will provide you some basics on container garden design and installation.
 Since I’ve been on this Redeem Your Ground journey, I have had the incredible fortune to meet a number of people who share the same love of family, design, and the outdoors. One such person is Helen Weis. Helen is the owner and designer extraordinaire of Unique by Design – a container and landscape design & installation firm out of Edmond, Oklahoma.
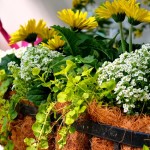
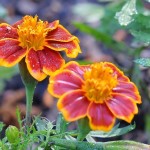
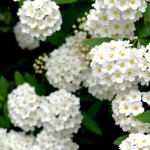
I’d like to say that her work says it all…and it does come really close – her container designs are ah-may-zing! (As you can see for yourself from these pics of some of her creations below!) But what they don’t fully capture is how gracious and giving of a person she is. This post is an example of that.
When considering my post on container gardening, I thought that there is no better person to provide true insight into this popular topic than my friend and container design expert. So, on a whim I reached out to Helen to see if she’d be willing to invest a bit of time and insight into me and my fledgling blog. And boy did she! Below you will find her answers to several questions I had on the basics of container gardening. [Click here to see my spring container garden plant combinations.]
![]()
Golden Rule of Container Gardening
The golden rule of container gardening is to think in terms of tall, full & trailing. Or some will say … thriller, filler, and spiller … kinda catchy.
-
 Your taller plants should be at the center of a round or square container that sits away from your home…or in the back of a rectangular container. If planting a long window box I like to be repetitive with my centerpiece plant.
- Around or in front of your taller plants you will place your fuller and medium height selections.
- Lastly, in front of all of these you should place your trailing plants.
In all, think of your container garden in terms of a painting – making sure to include a background, middle ground, and foreground.
Plant Size
I always plant containers full. In a container you don’t need to go by the space requirements listed on the plant label, since you’re not permanently placing the plants here. However, you will need to make sure you accommodate enough space for the root zones. My rule for containers and plant size is that you always use a centerpiece plant that is at least as tall as your container. This keeps you in proportion. I always find it odd to see a very short plant or shrub in a tall container. To me it makes the plant look stunted and dwarfed. Once you have established the proper centerpiece the surrounding plants will grow together cohesively, bringing the pot and the centerpiece together in harmony.
Soil
Soil is very important when planting containers. You want to hold water in, but you also do not want to keep air out. Obviously, you’ll want to use the type of soil that’s proper for the plants you’re using and the conditions for which they will live.
-
- If planting succulents, agave or cacti you are going to want a cactus type soil that drains well.
- When planting edibles you want to make sure that you have composted material with your soil to give them all those natural extras.
- When you are planting ornamentals it’s fairly simple and you should be able to use any quality, well-draining, mixed potting soil.
- When planting large containers it is not necessary to fill the entire container, but you can. If you don’t want or need to fill the entire container with soil, you can either fill the bottom with a lighter filler material (e.g., packing peanuts) or create a false bottom.
- If planting a centerpiece you want to have planted for many years, I suggest giving it as much root zone as possible and fill the entire container.
- I live in a state that is windy almost all of the time and those winds can easily surpass 50 mph. So I am often filling the bottom of my pots with rock or gravel, most certainly if using a top heavy centerpiece.
- It is only necessary to have 12” of soil for most annuals, but I always use at least 24”. You have to remember that the less soil you use, the quicker the container is going to dry out – so if you live in an area where it is extremely hot for months, you may want to consider using more soil or a larger container.
Container Selections
There are basic rules to selecting containers, but the most important one is selecting the proper type of container for your situation.
-
- If you are in a zone which gets extremely hot or is surrounded by concrete, then you will want a large container which will hold moisture. You do not want a container which will increase in temperature due to its surroundings.
- Stay away from iron and steel as these will literally bake your root zones.
 If you are in a windy area you obviously do not want to use foam or ‘light’ substances, otherwise you will be picking up your container and putting it back together on a regular basis.
- I would also shy away from tall narrow pots in a windy area.
- Personally, I have never liked anything with a ‘liner’ as a container for ornamentals, such as coco-fiber – simply because it dries out the root zone the quickest. Of course, there is a place for such things, but more often than not you will become a slave to watering it.
- Zinc or galvanized is my preference for metal and concrete pots are wonderful when used in shady areas.
- I prefer using baked ceramic pots whenever possible.
Breaking Rules
The Dali Lama has a great saying … “Know the rules well so you can break them effectively”. This statement proves to be true. Then again, who says there are absolute rules to container design? When it comes to containers your only limitation is truly your imagination. If you can grow it in the ground, chances are you can grow it in a pot. It’s all about proportion and size. Remember, containers are not permanent plantings. Knowing this opens up a whole world of ways to experiment and effectively challenge your own set of rules.
![]()
Thanks so much Helen for graciously paying it forward and giving all of us some of your awesome insight into creating beautiful container gardens! So much appreciated!
Now…with the basics of container gardening in hand hopefully you’ll be a bit less overwhelmed when you go plant shopping later this week. Making your shopping experience more enjoyable…and more importantly, your container garden masterpiece more beautimous.
Lastly, as I’ve suggested on other posts, try not to get wrapped around the axle for not knowing everything or never having done something before. Just do it! You’ll learn what works & doesn’t work…and what you like & don’t like as you go. I’m certain you’ll not only enjoy the end result, but getting your hands dirty along the way too – I guarantee it!
Take care,


If you're not already subscribed to RYG and want to get periodic updates, links to new posts & other ground redeeming info ... just enter your email address below. Easy as that!
Very inspiring read! Helen Weis has a definite artistic eye for design. Y’all have inspired me to get started filling my pots with color. I will send you some pictures as soon as they look as beautiful as the ones she has shared with you. Thanks, Douglas (I guess it’s just plain Doug or D. now!)
Thanks Helen…aka Mother Dearest! Can’t wait to see what you create…no doubt it will be colorful! Take care, Douglas (to you!)
Helen, thank you so much for the lovely words. Hope your pots are full of wonderful, wonderful this year. Be sure to share the pics with me, Doug. H.
Thanks for all the information. It will really help this year as I plant my pots.
Linda…so glad you found the information helpful. I’d love to hear/see how your pots turn out. I’m on my way out now to pick up some plants for some of my pots and window boxes. Take care, D.
Doug, great info just in time as I start to figure out our front porch plantings 🙂 I like the concept of thinking of the container garden as a painting creating the depth with the layers. Good stuff and thanks for all the help friend!
Thanks Chuck! Being an artist at heart, I’m sure your front porch containers are going to look great. Can’t wait to see them. Take care, D.
It’s funny you say that, Chuck. Every time I walk into the nursery with intent on putting together containers, I am often thinking of choosing color’s in exactly the same way. Then I go about adding layers and depth… it is a great concept for designing pots. Enjoy those front porch pots! H.
I was going to take this year off from doing any container gardening and put my time and energy to other things that need to be done around the house.But after reading this post and seeing Helen’s amazing work I have been inspired to start my containers! I can’t wait to see all the pics of everybody else’s creations. Thank you Helen and Doug!
Thanks Donna! Can’t wait to see what you come up with. Happy Easter! – D.
Have so much fun, Donna!
Thank you for all the great and helpful information! I was looking for something else and stumbled on this. So glad I did!! Can you share what the plant is in the first picture (leaves are green & waxy and the bloom is large and orange)? It is beautiful!
Kris…thanks so much for your comment and your question. Since it’s Helen’s design, I’ll let her chime in; however, I believe that the plant you’re asking about is a Hibiscus. They come in all kinds of vibrant colors. Here’s the link on Wikipedia: http://en.wikipedia.org/wiki/Hibiscus. They grow as far north as hardiness zone 4, but do best in warmer, tropical/sub-tropical climates. I grew up in Central Florida and my great aunt had an entire hedge of bright red Hibiscus…and my siblings and I loved to cut them and bring them into her. Again, I’ll see if Helen can chime in to confirm…but I’m fairly certain that’s what it is. Thanks again Kris…and take care, D.
Thank you so much for your reply!! You have been so helpful and I really appreciate it!!! I’m going to try it in the container on my front porch, which gets afternoon sun, so I think it should do well. And what a wonderful memory of your childhood!! 🙂
Awesome…let me know how it turns out! And yes…it is a great memory. “Auntie” actually raised my dad…and she was the quintessential, sweet little granny…who loved each and every one of our pitiful little bouquets! Take care Kris! – D.
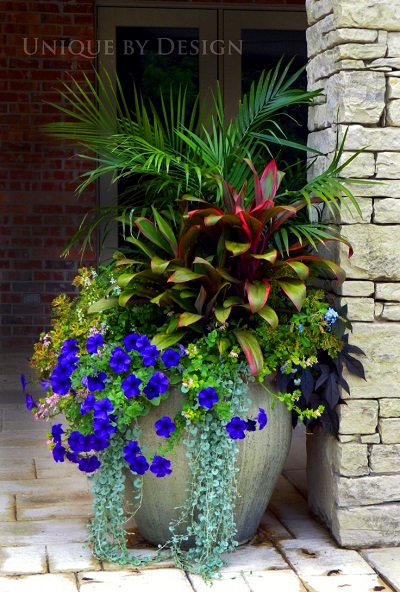
Kris, Thank you so much for your complimentary words… those are indeed tropical Hibiscus, which come in several colors. Here I have used an orangy/red to compliment the patio furniture and bring in some deep color since the surroundings are all earth toned. When using tropical hibiscus as a centerpiece be sure you purchase a large one. If you start out with a short one in expectations that it will get tall, then the competing plants surrounding it will quickly take over… just a tip. I have my hibiscus shipped in from Florida, as several nurseries around the country do. It should not be a problem to find a source for them in your area. The are a great colorful centerpiece plant for hot areas like ours. Enjoy!
I just have a question about the striking arrangement containing Palm, Dichondra Silver Falls, Potato Vine, and the beautiful almost royal blue Wave Petunias. I can’t seem to figure out what the other plant is that is against the palm? The one with the burgundy’ish purple variegation on the green leaves. At first glance I thought it was a type of Dracaena, but further research proved me wrong. Just very curious. That is a striking arrangement and I am very much an admirer of your work. I love planting with boxwoods and zinc containers…I use those all year for events and backdrops. I often even bring them in my home if I’m having a get together. I put them in dark corners and they just bring anything little space to life and so hearty! Well thank you in advance if you or anyone out there can answer my question. It is sincerely appreciated since I plan on visiting the nursery this afternoon or tomorrow. Everyone enjoy spring/summer 2014, take care, and happy planting and creating.
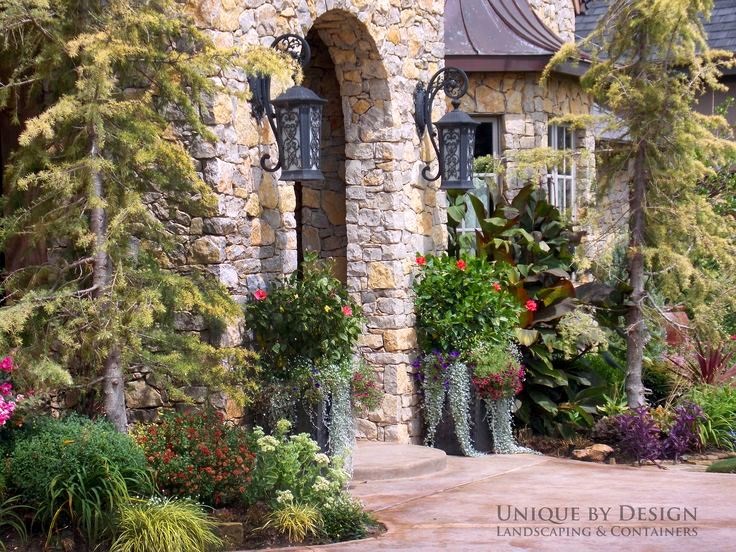
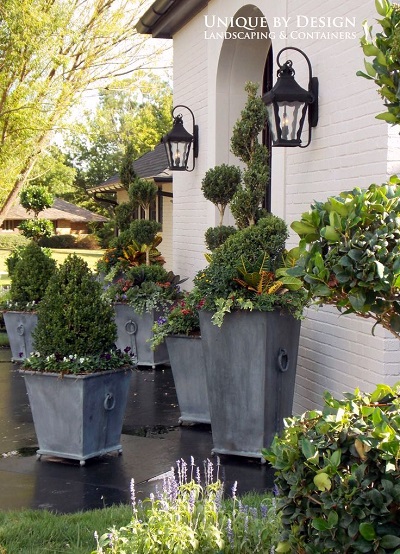
Bradley, Thank you so much. The plant which you are speaking of is a Red Sister, Hawaiian Ti, Cordyline plant. Another great performing tropical for this area. The placement of this container is in the back of the house between the covered porch area and the pool. The surroundings are all rock and concrete and white, white, white with black furniture. The only color around the pool are the containers so we always try and get flashy with the one here by the back and show off some foliage. With the pots across the pool we use large statements with surrounding color. You should be able to find cordyline in most nurseries and if you cannot simply ask them to bring it in for you. They will also overwinter well in a bright window with low water.
I have to say, I also love the use of boxwood in zinc. These topiary boxwood stayed outside all winter, first year planting last year. Happy to say they did great, but I love your idea of bringing them in for fun and brightening up a space. So very clever, you are.
Hi,
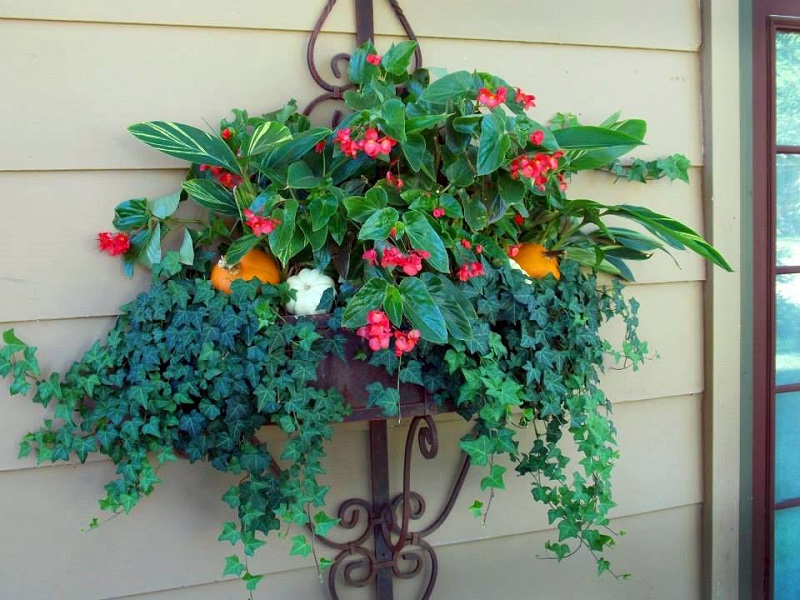
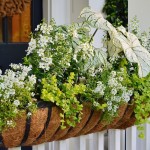
Beautiful work! I was wondering what the green vine-like spillers are called in the 3rd picture down please?
Thank you
Louise, thank you so much for the kind words. That is English Ivy trailing out of that wall container. Hope this helps and sorry in the delay of getting back to you. Enjoy the day!
I would love to know how long you leave a display in a container for? and what do you do with them afterwards? May seem like silly questions but I’m new to container gardening!
Hey Jessica…thanks for checking out RYGblog AND for your comment. Your questions aren’t silly at all. I’m not certain I fully understand them…so forgive me if my comments are off-base, but here are my thoughts.
I’m assuming when you say “display” you are talking about those elements you add to a container garden to add additional interest and texture. So…I think HOW LONG you leave a display in a container garden depends on 2 things: 1. Seasonality of the display and 2. the “shelf-life” of what you’re using in your display (i.e., is it “perishable”?).
1. SEASONALITY: The more specific your display is, the shorter amount of time you’ll want to keep it in your container. In other words, if your display is specific to Halloween (for instance), you’d keep it in their a shorter amount of time than you would if your display was more generally an “autumn” theme.
2. “SHELF-LIFE”: If your display is perishable (like pumpkins), it will only last as long as it will remain “fresh” (i.e., before it starts rotting). So a perishable display would last longer than if you used an object (e.g., stone figure, iron object, grapevine/basket).
These may seem like obvious answers…so forgive me if they don’t touch on what you’re asking. And if not, please chime in with further explanation.
But as a closing comment, since I like to maximize the impact and longevity of my efforts with any gardening project, I’ll generally be less specific with my display themes and use objects where appropriate (vs. living things). This allows the display to “live” longer. I also tend to think of the seasonal “display” aspect of a container garden like I do annuals. In other words, I most often will include an evergreen plant as the central element (providing height), add perennials (that I may eventually transplant into my landscape beds), and then annuals for seasonal color (or “display” if you will). That way my containers always have something living in them…and then I add other elements to keep them ‘fresh’ and to add a bit of change/interest in my garden. Make sense…helpful? Please chime in.
I’ll also reach out to Helen to see if she can chime in with her expertise!
Thanks again and take care, D.
Excellent question, Jessica and great answer, Doug.
The only thing I would add is what we often do is plant a sturdy, bold evergreen in a spot that needs form all year long. Then we surround plant it seasonally. Depending on how deep and wide the container is, you can usually leave this evergreen in for 2-3 yrs. After that they will usually get root-bound…but just like moving furniture, it’s always nice to mix it up every so often and a replacement tree goes in and the old goes into the landscape.
On that note, Doug’s advice is truth spoken and a great rule to go by. I love his perspective on design and therefore always enjoy getting together with him to help everyone ‘Redeem their Ground’.
Delighted that you have taken a passion in containers, Jessica. It is the path that started this journey in design and still today one of my favorite things to do. Take care, Helen
Thanks Helen…and backatcha my friend!!! Take care, D.
[A REFERENCE TO OUR POST ON MARIANNE VERRILLI’S FASHION & LIFESTYLE BLOG, THE M.A. TIMES] 2. Choose The Right Ingredients. Planting a pretty pot is about more than just picking out the brightest colored flowers. It starts with creating a good home for them – which includes picking out the best soil and pot for your environment. Depending on weather conditions, climate, and location, the suggested types of pots and soils can vary. For an extremely helpful guide on which will work best for you, check out this website here. (http://www.thematimes.com/?p=14397#more-14397)
Thanks for the post shout-out M.A.! And your blog is beautifully awesome. I look forward to seeing more of what you share. Take care, D.
Doug,
We saw the spread in southern living. It was a great surprise as I read through it in the “library”. What a joy to see what you guys have done.
Hey Tom…first of all, thanks my friend. It is quite crazy to see your name, mug, and yard in the glossy pages of a magazine…and Southern Living to boot! CrayCray! Thanks for your encouraging words. And second, I could have probably done without the visual of you in the “library”…but I get it and appreciate it! Say hello to TCG for us. Take care, D.
Thank you, Melissa!!
Glad you found it helpful Melissa! I look forward to checking out your blog as well. – Take care, D.
Literally just moved into a new apartment today. Bought some containers yesterday but couldn’t figure out what to fill them with. Perfect timing! Let’s goooo!
[…] – locations not usually thought-about prime habitats to research the intersection of individuals, plants and pollinators. And we shouldn’t reside our lives in fear of what would possibly occur. They’re likely to know […]