My Potting Bench (Post #1 of 2)
Greetings fellow Ground Redeemers. I hope this post finds you well…enjoying the final days of summer – which is so hard to believe. Well, I’m excited about sharing how I’ve spent some of my summer days…building a potting bench. And I’m a tad bit proud too…not only because I made it with my own two hands, but…because I made it for basically nothing. That’s right…less than $15 bucks!
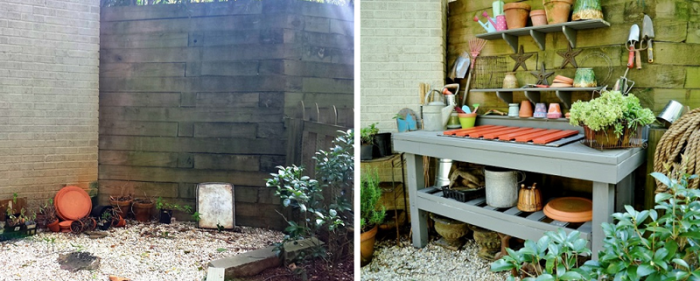
The other reason I’m also really excited about finishing up my potting bench is because I’m finally putting to use a dark, previously useless, awkward corner of my yard. Pretty big transformation…if I do say so myself!
Materials Used for My Potting Bench
Alright, you may be asking yourself, How did he make a potting bench for next to nothing? Well, quite simply…I used materials that I already had.
- The frame was made from 1×2’s, 2×4’s, and 4×4’s left over from other projects. (Okay…I guess I spent money then…making it clear that I don’t estimate my material needs well…but for this project I spent zippo on the wood and it required no trips to Home Depot!)
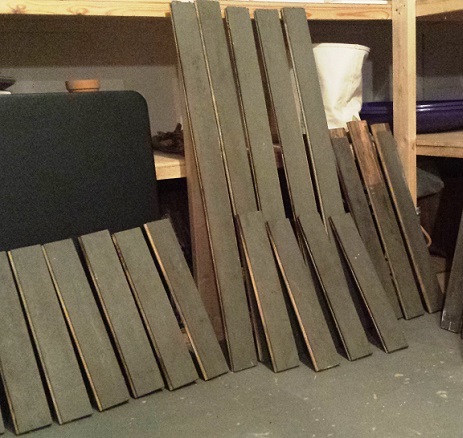 What I’m most excited about though is…for the rest of the potting bench (and the shelves above) I used some old tongue & groove flooring boards that I ripped up from our back porch earlier this year. They’ve been sitting in a pile ever since, waiting for me to find a use for it…and now I have!
- Because we basically paint everything the same 3 colors (black & shades of grey and white…exciting, I know), I always have some extra buckets of paint for touch-ups lying around. So after a good shake, I used some darker gray stain to paint the potting bench. It’s the same color we’ve used to paint a number of other elements in our backyard (e.g., deck, treehouse, and porch flooring)…so everything flows together nicely. And where we want to draw some attention to something or add some interest…that’s where we add some color.
- Speaking of…I used some red paint I had left over from the pallet coffee table I built last week to paint a grid-like cover to put on top of the wash basin when it wasn’t in use to give me more workspace. (I’ll explain more about this grid-like cover thingy below…and also, stay tuned for the post on the pallet coffee table that I made.)
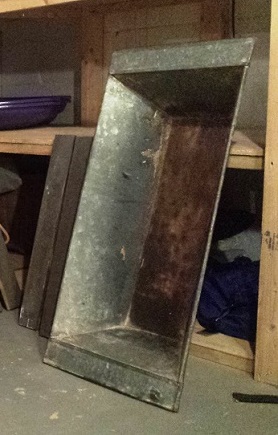 Okay…I just remembered…I did spend more than $15. Several months back, Britt and I found a really cool, old wash basin at Scott’s Antique Market…which was actually the inspiration for our potting bench. We paid about $30 for it.
- I spent the other $15 on 6 small braces to create the 2 shelves that hang above the potting bench.
So there you have it…beyond some screws and a few nails, that’s all the material I used to build our potting bench…and 99.99% of it was re-used, re-purposed, and re-cycled. Oh, how green am I?!
Instructions to Build the Potting Bench
Sorry…but I’m not going to actually provide you either a step-by-step set of instructions or a diagram for my potting bench on this post. Primarily because it’s a very basic construction and it was “designed” specifically for the space it lives in…and yours likely will too…unless you’re going to buy a pre-built one. That said, below you will find a mix of tips and a few other interesting aspects of my potting bench…well, at least I find them interesting.
Construction
As I mentioned above, my potting bench is really very basic…and I would say most potting benches are. It essentially consists of a workspace on top and a shelf below. With the exception of the wash basin and the small shelves above, that’s it.
-
- If you’re using materials that were once used for something else, you’ll probably need to be creative with how you use them. The creative process of trying to figure out a solution to something is what I like most about re-purposing materials…that, and the fact that they’re free. For instance:
-
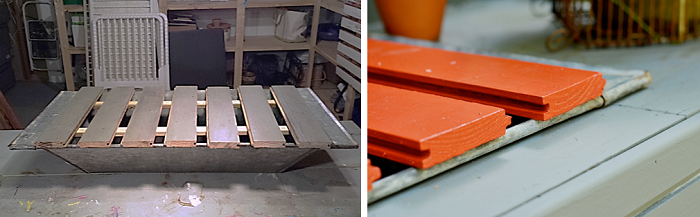
- I used the tongue & groove boards to wrap around the potting bench…the top workspace and the shelf below it. I could have stripped the “tongue” off the board so that they butted right up next to the other piece of 1×2 trim. But instead I left it alone and allowed it to create what looks like a nice routed detail…which resulted in something that was more interesting with a lot less effort…like no effort.
- Similarly, for the grid-like cover that sits on top of the wash basin when it’s not in use and the bottom shelf, instead of putting the tough & groove boards together as they are designed, I let them all stand alone. Again…easier, looks great…and this design serves a function in both applications…allowing dirt or whatever else to fall through.
-
- If you’re using materials that were once used for something else, you’ll probably need to be creative with how you use them. The creative process of trying to figure out a solution to something is what I like most about re-purposing materials…that, and the fact that they’re free. For instance:
-
- If you want to know more about the actual construction…you’ll need to wait until tomorrow’s post. But again, it won’t be a step-by-step set of instructions, but rather some directional how-to’s.
Wash Basin
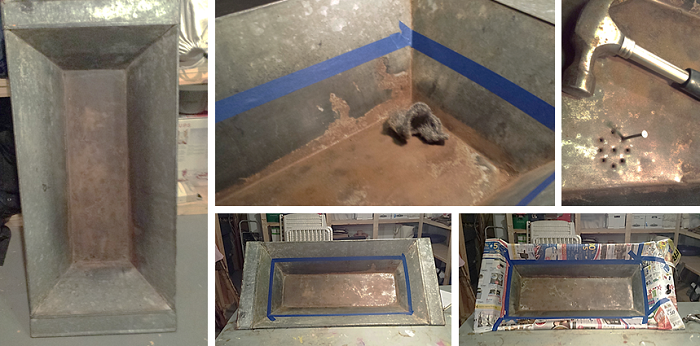
As I mentioned above, besides needing a potting bench…it was the wash basin that got me to go ahead and make our potting bench. I like the fact that the basin looks really old…because it is…which lends to the character of the potting bench. Besides making sure that the design of our potting bench took the wash basin into consideration, I did have to do a few things for it to do what I needed it to do:
-
- I rubbed it down with some steel wool. This got the dirt and some of the rust off of it.
- Because I wanted the water to drain, I simply hammered a grouping of nail holes at the center/front edge of the basin. This allows the water to drain into a bucket below…so I wouldn’t have to pick up the entire basin and dump it every time…and so it wouldn’t create the perfect mosquito breeding ground. When I want to collect water in it, I’ll simply use one of those flat rubber stopper deals…like you’d use in an old bathtub.
- Then, because I wanted to slow down the rusting process, I decided to paint the bottom ½ of inside of the basin…the part that was already rusting a bit, with flat black Rust-oleum paint…which was really easy. All I did was:
-
- I put a strip of painter’s tape around the inside of the basin where I wanted the black paint to start/stop. This made it much easier to get a really clean line…vs. dealing with the newspaper at the same time I was trying to work with the tape.
- Next…I added the newspaper with another strip of painter’s tape…but now I didn’t have to worry about it being perfectly straight…as long as the 2nd strip of tape was somewhere on top of the 1st.
- Then I painted it with the spray paint…let it dry and then removed the tape & newspaper.
-
-
- For now I’m going to use a hose as my water source, but eventually I’m going to put a rain barrel above my potting bench and use it. Again, aren’t I so green! (Stay tuned for that post as well.)
Grid-Like Cover for the Wash Basin
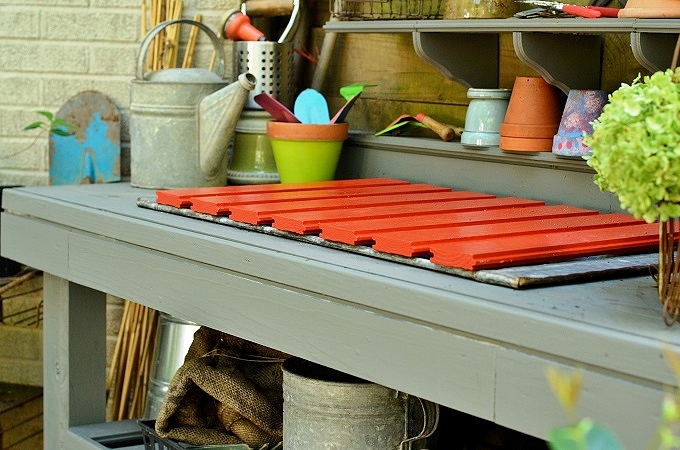
When I finally measured everything out relative to the wash basin I realized that for a 5 ½’ wide potting bench I wouldn’t have much workspace. That wouldn’t cut it…I needed a solution:
-
- So with a pile of the extra tongue & groove boards still sitting there, I simply cut to size and nailed some of them to 2 1×2’s.
- Then to add some interest and a bit of pop to this otherwise dark corner of my side yard, I painted it red.
- Now I can use the entire area of the workspace…and the bonus is, when I am actually using my potting bench to pot things, the dirt will simply drop through into the basin…making clean-up that much easier.
This is another example of needing to be creative in finding a solution to a problem…which resulted into something more aesthetically interesting, while providing more functional value.
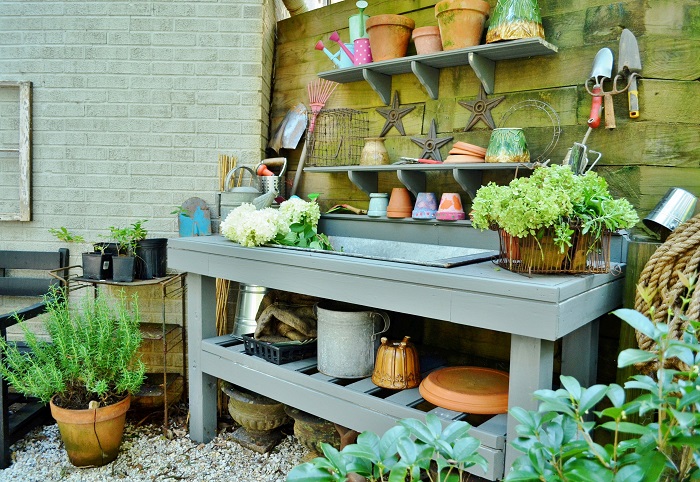
![]() I’m certain…as I begin to use my potting bench I’ll add more things to it to make it even more useful (e.g., hooks and pegs, etc.), but for now I’m really happy how it turned out. By re-using some old materials, a bit of creativity, and a good bit of elbow grease, I feel like I’ve definitely redeemed an otherwise useless area of my yard. I look forward to using my potting bench to redeem a bit more ground…and it will be the perfect spot to train my girls (all 3 of them!) in some gardening skills.
I’m certain…as I begin to use my potting bench I’ll add more things to it to make it even more useful (e.g., hooks and pegs, etc.), but for now I’m really happy how it turned out. By re-using some old materials, a bit of creativity, and a good bit of elbow grease, I feel like I’ve definitely redeemed an otherwise useless area of my yard. I look forward to using my potting bench to redeem a bit more ground…and it will be the perfect spot to train my girls (all 3 of them!) in some gardening skills.
I’d love to hear how you’ve done something similar…so please share your stories with us.
For more on the construction of my potting bench, check back in for tomorrow’s post.
Take care,


![How to Hang String Lights [Video with Exmark]](https://redeemyourground.com/wp-content/uploads/2015/06/4th-of-July_String-lights-_-RYGblog-150x150.jpg)


If you're not already subscribed to RYG and want to get periodic updates, links to new posts & other ground redeeming info ... just enter your email address below. Easy as that!