My Potting Bench (Post #2 of 2)
If you’re just tuning into RYGblog and haven’t seen the first post about my potting bench, I’d recommend that you do. It provides you with a bit more context, as well as some instructions on a few of the potting bench’s details (i.e., this post doesn’t cover it all).
Regardless, let me remind you of what this dark, useless corner of my yard was turned into after I added my potting bench…
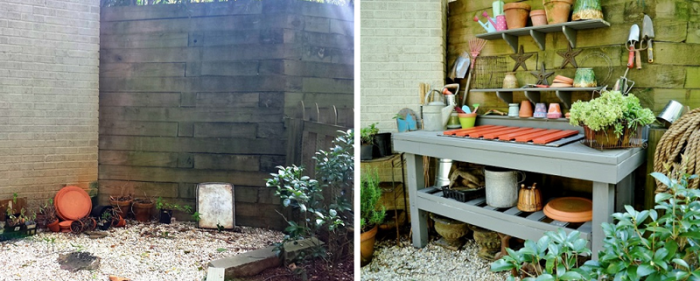
I’m really pleased how it turned out functionally and how it transformed the entire space. Below you’ll find some directional instructions on how I constructed the primary components of my potting bench.
Top Frame:
- Again, the space I put my potting bench in was an awkward corner of our side yard – an area that we now call Scott Family Farm…where we have our chicken coop / bunny hutch, a potting shed, and a work/eating space. One side of this awkward corner is our house and the other is the backside of a 7’ retaining wall (that we built to level out our front yard). To make it easier to construct, I designed the potting bench to be screwed directly into the retaining wall. So the first thing I did was measure the width of that wall. After that I essentially put away my measuring tape…everything else was simply a function of that one measurement and was marked on site.
- I cut the 2 long segments of the frame (the front and back) out of 2 2×4’s at the same measurement as the width of the wall. For the shorter sides of the potting bench I cut 2 other 2×4’s so that I could fit a whole # of the tongue & groove boards on top to form my primary workspace, while still being able to drop in my wash basin. It ended up being about the depth of a kitchen counter…but maybe a bit wider so that I wouldn’t have to cut the last board length-wise.
- After screwing these 4 2×4’s together to make a rectangle, I then cut and screwed in 2 additional 2×4’s the same length of the short side of the potting bench to add support for the basin. (If you aren’t going to have a wash basin, you can obviously skip this step; although depending on the size of your potting bench and what material you are going to use for your top workspace, you may need to add some sort of support as well.)

- Finally, using some scrap wood as braces in the front, I literally screwed the top frame into the retaining wall…using temporary support boards to keep it level and hold everything in place until I added the legs.
Legs & Bottom Frame:
- I then took some 4×4’s that I had left over from previous projects and placed them at the 4 corners inside the top frame. Using a level I marked where I needed to make my cuts…and because the potting bench is not on level ground all 4 legs measured differently.
- After I made my cuts, I screwed all 4 legs in place. That’s it.
- To make the bottom frame for the shelf, I basically did the same thing I did for the top frame. But instead of having the legs be on the inside corners of the bottom frame, they were just outside…wanting to have the top workspace hang past the bottom shelf.
- Knowing that I wanted to place a bucket under the wash basin to collect the water, I simply screwed in these 2×4’s where they would give me space to do that while still giving me enough space on the ground to store things.

Bottom Shelf & Workspace:
- The rest was a piece of cake. For the top workspace I measured (again, not with a measuring tape, but by marking it onsite), cut, pieced together and nailed in my tongue & groove flooring boards.
- For the top I wanted to have a solid workspace, so I put them together tongue & groove style.
- For the bottom shelf I chose to turn the flooring boards 90 degrees and have a gap between each board.
- I had the luxury of squeezing through the hole for the wash basin to nail these boards in to make the shelf. If you don’t have said hole, I’d recommend you complete the shelf before the top workspace.
Trim & Paint:
- I then used some PT 1×2’s to trim around both the top workspace and the shelf below.
- Just below the 1×2 I wrapped what was still showing of the 2×4’s that made up the frame with some of the tongue & groove boards.
- I thought about stripping the “tongue” off the boards, but I decided not to…because with the “tongue” was placed just below the 1×2 it creates the look of having a nice routed detail – bonus…easier and more interesting!
- I then painted…everything gray…well, all but the basin cover.
- Originally I had planned on leaving the tops of the tongue & groove boards alone. They were already painted the same color I was painting the rest of the potting bench (surprise!)…and I liked the thought of my potting bench already looking like it was broken-in. However, I realized that it would take me ½ the amount of time to just paint the whole thing…trusting that with the weather and all the use it would get, my “new” freshly painted potting bench would look “old” in no time.

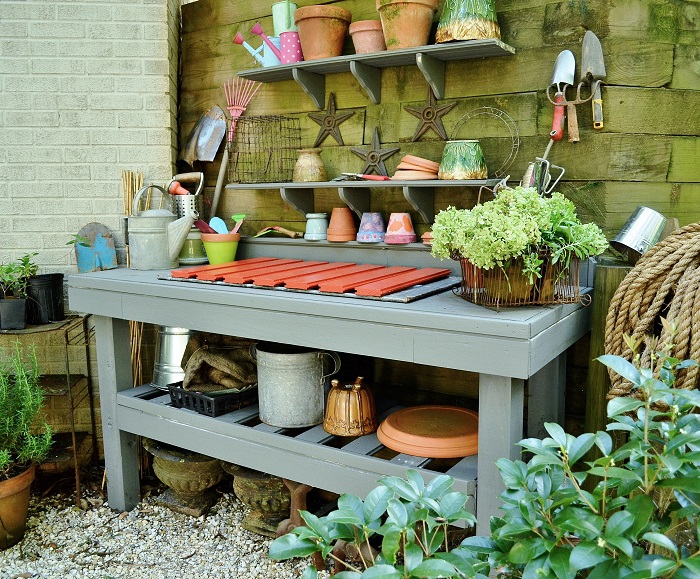
- Wanting to add a bit more interest to my potting bench, I decided to paint the cover for the water basin (when it’s not in use), red…the same color red I painted the legs of the pallet board coffee table I built last week. Now stepping back and looking at everything, I’m glad I did. It just adds a bit more life to a once dark corner.
![]()
There you have it. Good luck with building yours…and please let me know if you need clarification on anything.
Take care,

You may also enjoy these posts from RYG ...
If you're not already subscribed to RYG and want to get periodic updates, links to new posts & other ground redeeming info ... just enter your email address below. Easy as that!


![How to Hang String Lights [Video with Exmark]](https://redeemyourground.com/wp-content/uploads/2015/06/4th-of-July_String-lights-_-RYGblog-150x150.jpg)


Wow! This is so fantastic! It is just beautiful & so functional. Not only can you use it for all of you potting needs, but when entertaining it will make an awesome bar! What a fabulous addition to any garden., everything right at your fingertips! Love it!!!
Thanks Brenda! I agree…I think that it could be an awesome bar too…with the basin being a perfect spot to cool down some drinks. I’m getting ready to add some string lights in the area…making it an even better place to hang. Britt’s not certain that that’s the case since all this is near the chicken coop and around to the side of our house. I get that…but as long as it’s not stinkin’ to high-heaven over there, if we were to have an all-yard get-together, I think it could really add a cool vibe to the whole shindig. Take care, D.
This looks great! Even if you don’t have to garden it looks nice enough to hang out in and be inspired. I also like the bar idea Brenda had!
Thanks so much Anna! So that makes 3 of us on it’s value extending beyond using it as a potting bench. I’ll have to tell Britt that most people tend to agree with me…and that we’ll need to hang out there more often…regardless of if it’s near the chicken coop or not! Thanks for your comment…and I’m now going to take a look at your blog. Take care, D.