How to Make a Scarecrow
The one downside to having a veggie garden is…the critters that come and feast on the vegetables without an invitation! It’s so frustrating going out to find a squirrel dining on the very nice, large, green tomato we’ve been waiting to ripen and dreaming about eating ourselves. And they never say “thank you”…such poor mannered critters!
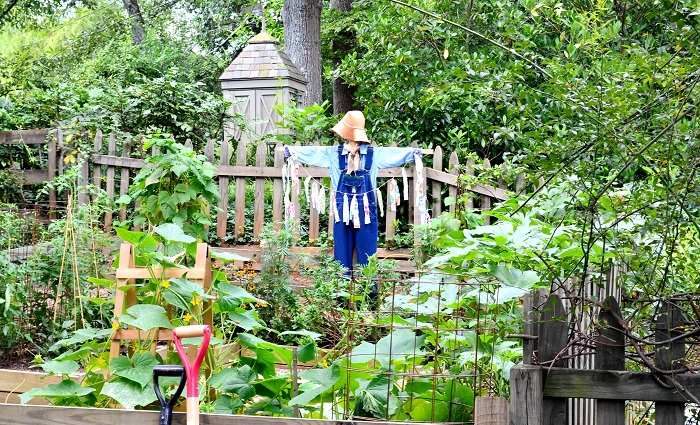
We have tried various methods of keeping them out. Some tactics have worked better than others and some have worked for some critters, but not all of them. The squirrels, in particular, are pretty confident that they own the place. So recently we decided to bring in reinforcements to guard and protect our garden…a homemade scarecrow. Most of you are probably thinking scarecrows are just a clever fall decoration…but not necessarily so. We are going for it this summer in hopes that our scarecrow will watch over our garden and keep the critters away. So far so good…at least for this week!
 I must say I love our scarecrow’s presence in our garden…she’s quite charming! And yes…our scarecrow is a she….we named her Sally! (Don’t ask why…because I don’t know. But our Mr. McGregor just thought we should name her…and started calling her Sally.)
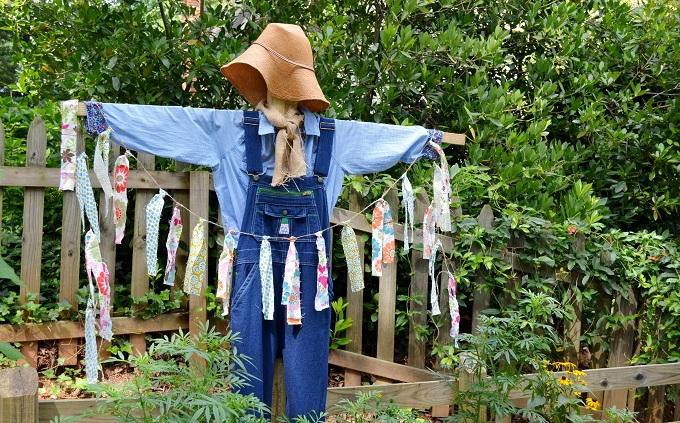
 Anyway…I think her cute fabric banner is part of her charm! I saw this on Pinterest and thought it was a cute and clever addition. When the wind blows it adds a bit of movement and the fabric adds pops of color…both which hopefully add to startling the critters and keeping them away. (Click here to go to the post on the 2 little hooligans blog that initially inspired me.) It was a really simple project that the whole family got into!
Here’s What You’ll Need for Your Scarecrow
- 2 pieces of wood (1 2×4 and 1 1×2)
- Button down shirt
- Denim overalls
- Straw hat
- Burlap, fabric or a bandanna for the scarf
- Twine
- Scraps of fabric
- 2 screws and 3 thumbtacks
A great place to get your scarecrow’s clothes is at a Thrift Shop or Goodwill…or maybe find something you have in your closet. For Sally’s clothes, we had the hat and overalls…so all we had to buy was a gingham shirt at Goodwill. I cut a piece of scrap burlap for the scarf, but you could use a bandanna or another scrap piece of fabric. After you’ve gathered the “outfit” then you can start putting everything together.
How to Make Your Scarecrow
There’s really nothing to making your scarecrow…it will literally take you minutes to do…once you have all your materials.
- Cutting the Body & Arms:
- We used a 2×4 for Sally’s body and a 1×2 for her arms (both pressure treated)…although you could really use whatever you have in your scrap pile.
- Since we were going to screw Sally directly to the picket fence that surrounds our veggie garden, our Mr. McGregor cut the 2×4 the height we wanted her to stand. Sally is about 6.5′ tall…wanting her to have a clear view of the entire garden. If you need to put your scarecrow into the ground, I’d recommend that you’d at least factor in an additional 18″.
- Sally’s shirt was a hand-me-down from someone who was apparently quite petite. So our Mr. McGregor chose to use a 1×2 vs. a 2×4…and then measured and cut it to be just a bit longer than Sally’s outstretched arms.
- Dressing & Connecting Your Scarecrow:
- Most scarecrows don’t have elbows…at least Sally doesn’t, so you’ll want to put your scarecrow’s shirt on before connecting its arms to its body. Otherwise you’ll have a heck of a time trying to pull the shirt around the body…we found that out the hard way. Once you’ve done that, then simply screw the 2 pieces together…leaving about a foot above its shoulders to rest its hat.
- You will then need to cut a hole in the crotch of the overalls…through which you will thread your scarecrow’s body.
- Once you’ve hooked your overalls straps, your scarecrow is essentially dressed. All that’s left is to tie on the scarf and put on the hat…which we simply used a thumbtack to keep Sally’s in position.

- Adding a Little Scarecrow Bling…a Fabric Banner:
- The last thing we made was the fabric banner for Sally to hold.
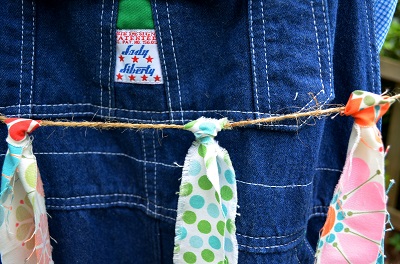
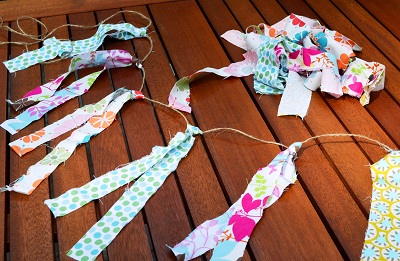
- I used some scrap fabric and cut them into 1.5”-2” wide strips…about 20” long.
- I then cut a piece of twine about 11′ in length. The length of your banner will obviously depend on the length of your scarecrow’s arms, her height, and
 how long you want it to dangle on the sides.
 - Then I tied the strips of fabric onto the twine about 3” apart…varying the fabrics as I went.
- Once that was done, we hung the banner over Sally’s arms…letting it sag in the middle and then tacking it into place.
- Placing Your Scarecrow:
- All we had left to do was to move Sally to her new home…our veggie garden.
- Again, we did that by simply screwing 1 deck screw directly into the picket fence surrounding our garden. You’ll need to do whatever is best for you and your scarecrow.
That’s it…and I have to say, I think Sally is the cutest scarecrow I ever did see! And so far…she’s done a fine job at keeping those nasty critters out!

Our girls think she looks a bit thin…so the next time my Mr. gets some straw for our chickens, we may fatten her up a bit. But for now, I’m just really pleased with how the newest member of our RYG family turned out!
 Oh…almost forgot to mention. If you want to involve your kids a bit more…especially if they are younger, try reading “The Tale of Peter Rabbit” after you’ve made your scarecrow. The story will come alive that much more now that they have their very own scarecrow that they helped build!
Take care,

You may also enjoy these posts from RYG ...
If you're not already subscribed to RYG and want to get periodic updates, links to new posts & other ground redeeming info ... just enter your email address below. Easy as that!


I absolutely LOVE Sally! She is adorable and adds another element of charm to your already exceptional garden design. Simple yet alluring, but HOPEFULLY NOT to the critters!!!! She’s got a great little sass along with the nostalgia, style and function. Very impressed.
Thanks Brenda…we kinda like her too. Having a wife, 2 daughters, 7 hens, and a doe rabbit I was hoping that our scarecrow would have been a dude. But with all of the hand-me-downs coming from women, I didn’t think that was quite fair. So “Sally” she became. Take care, D.