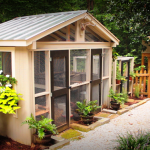
Our Chicken Coop Design (Part 3 of 3)
Finally! My last post on the design of our chicken coop. Below you’ll find a description and rendering of the final 3 elevations – right, left, and rear. Part 1 provided a schematic of the area where our coop/hutch sits, as well as a floor plan. Part 2 provided a description and rendering of the front elevation.
![]()
Right Side Elevation of the Coop
This is the side of the coop next to the run where we retrieve the eggs, have another point of access to clean things out, or just peek in to check on our feathered friends.
- The top 1/2 of this side of the coop is almost entirely a window of hardware cloth (approximately 33″ x 53″). The trim is made of 1″ x 3″ boards, painted the same color white as the trim on our house.
- I used the same gate latches as I did on the front for the doors.
- To keep the egg “hatch” from falling down when open, my oldest daughter…Brown-Brown, had the simple, but great idea to simply add a loop of string tied to the hardware cloth of the window above to hook the latch when opened. This allows us to use both hands when retrieving the eggs.
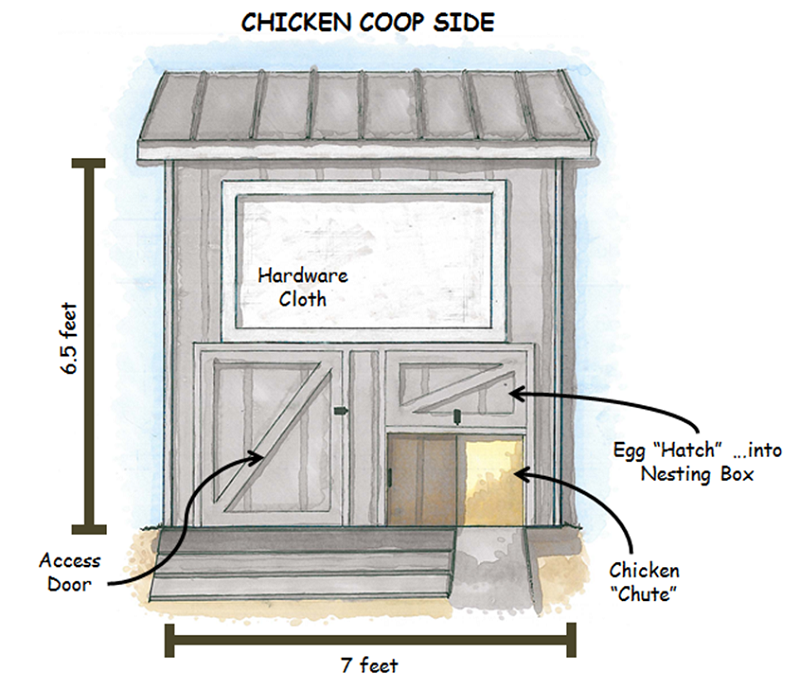 The access door and egg “hatch” is constructed of the same siding that I used for the other sides of the coop, framed and reinforced with 1″ x 3″ boards…and again, painted the same color gray as our house.
- Below the egg “hatch” is the “chicken chute” that leads to the run. Originally I had planned on opening/closing access to the “chute” every day…now I only close it when I want to isolate the ladies in the coop or the run to fix something or clean them out.
- Originally we only had pine straw outside the coop and between it and the chicken run. Since we were walking back there quite a bit…to get the eggs every day, after a rain it got really muddy. So within a few months of having our chickens I added a little walking platform made of decking boards…painted a darker gray – the same color of our back deck.
Left Side Elevation of the Coop…actually, of the Bunny Hutch
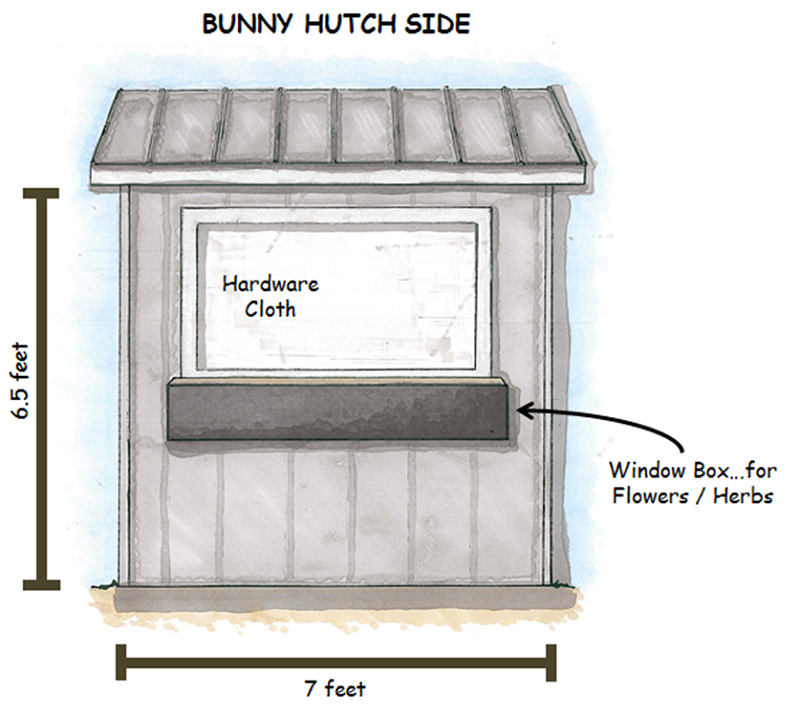 This is actually the bunny hutch side of our coop. Nothing much to say here, other than there’s the same sized window as on the right side, but since we don’t have all the other stuff going on for the bunnies, I added a large black window box. Having the window box gives me the opportunity to soften the space with plant material. Last year I planted a variety of annuals, but this year I’m thinking of planting herbs. Although this may drive Belle (our bunny) crazy, but not only will it be another place we can grow food (for us, the chickees, or the bunny), it will also provide a nice scent to combat with the stank of the chickens and bunny during the heat of the summer. I’ve also heard that the scent of certain herbs (e.g., lavender) lulls flies a bit…so that they’re not flying around as much…and therefore, not as annoying. I’ll let you know how that works out this summer.
Rear Elevation of the Coop
Again, nothing much to say here. As with the rest of the coop, I used pressure treated siding…painted gray. Then for purposes of ventilation and keeping a symmetrical design, I added 3 24″ x 33″ windows…trimmed out and painted like the others.

![]()
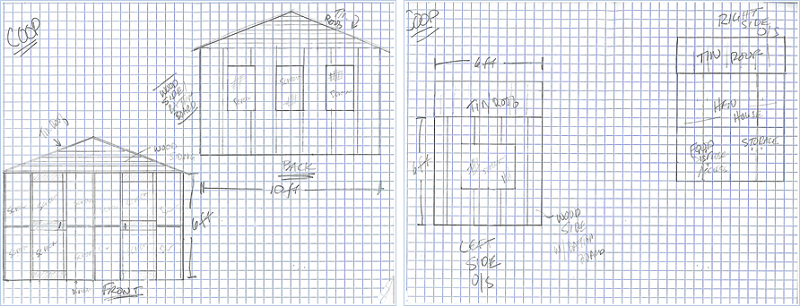
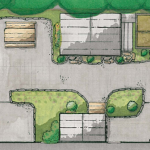
Before I conclude I want to make sure that you don’t think that you have to have fancy plans or drawings to create a great home for your chickens. Sure, you need to have a general idea, but you can do that in a matter of minutes with a pencil and a piece of paper. Here is what I worked from with my amazing handyman friends Ronny & Nick. As you can see, they are very rough sketches. Once we got started some of the dimensions and elements were tweaked a bit, but we knew directionally where we were going…flexing when we needed to.
So there you have it…a complete set of designs of our chicken coop / bunny hutch…with a few descriptions. What other questions do you have? What else can I help you with? I’d love to…just let me know.
Take care,
 PS: Here are the links to Parts 1 and Parts 2 of Our Chicken Coop Design…and a link to the video we made to introduce you to our little ladies.
PPS: I’ve had several folks ask about the panels we use to keep the wind out of our chicken coop during the winter…so I thought I’d post a couple of pics of them here. They’re not the best quality pics…sorry about that. When I put them back up this winter I’ll do another post with better pictures…but I hope this helps for now. Cheers, D.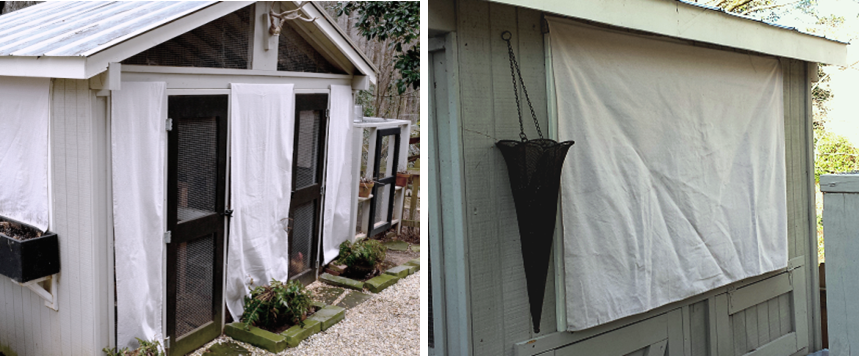
You may also enjoy these posts from RYG ...

If you're not already subscribed to RYG and want to get periodic updates, links to new posts & other ground redeeming info ... just enter your email address below. Easy as that!
Wonderful and very helpful. The time you took to share your work and talent is much appreciated.
So glad that you found the information helpful Becky! Hopefully it will help you towards having a coop/hutch of your own! Let me know if you have any other questions. Take care, D.
This looks great Doug. Very impressive information and love that you shared the details here. So professional! I’ve been enjoying reading your great blog posts, seeing the fun pics and easy on the eyes font and layout. Very well done. More please!
Thanks for the comments Joe…and thanks for reading our blog! We will do our best to get more content out there that will inspire or equip others to “redeem their ground.” Thanks much, D.
Doug,
Great stuff. Now if only Cobb County would let me raise chickens! Could you provide the same design suggestions for a raised garden bed? We really enjoy your blog.
Thanks Ed. Plan to provide some drawings of my raised beds within the next few weeks…so stay tuned. Hope you’re well. Take care, D.
Hi Doug, I love reading your blog. Your pictures are great and your family is adorable. Thank you for sharing all of your talents. Love, Sally
Thanks so much Sally! Really appreciate your support and encouragement. Hope to see you and your family soon! – D.
I absolutely LOVE your coop! Thank you for sharing your design. If you were to do it over again, what would you do differently? I often find the answer to this question just as informative as design plans. Thank you and Happy Thanksgiving!
Hey Kathy…thanks for your oh-so-kind words and for chiming in w your question. And it’s a great one.
What would I do differently w my coop design?
1. I don’t know if I would go to the trouble of having the extra access door for clean-out on the side…I have never used it.
2. I would have created access between the coop space and the bunny hutch space. Our bunny comes inside during the hottest summer months so there are times when our ladies could use the extra room to spread their wings at that time. I’ve actually recently retro-fitted the coop by cutting a hole in the lower half of the dividing wall and have a chicken wire panel that’s placed in front of it when I need to keep the areas separate. And by the way, if you don’t have a bunny and don’t necessarily need a larger separate space I have still found having one very helpful at times when I need to isolate one or more of my feathered friends (e.g., when one is broody; when one needs a time-out for some reason; when I have new hens I put them in there for about a week to acclimate them w the rest of the flock. So in your design maybe think through having a way to divide your coop even if temporarily.
3. Because my girls are always fluffing up their pine shavings whenever I open the door to the coop (which is often) some pine shavings always pour out…making it messy outside the coop and oftentimes difficult to shut the door. So I’m planning on adding a 1″x4″ removable guard of sorts to put on the inside of the threshold of the door. Removable because when I clean out the coop I’ll often pull a wheel barrow just inside the coop…makes it a ton easier.
4. I love having our storage shed just 5 steps away from our coop; however there are times when it gets really tight in there (like when I come home from the feed store with extra supplies. That said, I’m planning on making use of the some of the open ceiling space for those things that I don’t need immediate access to (e.g., extra bales of pine shavings, etc.). But when I do I’ll make sure that the girls can’t get to it otherwise they would roost on it…and dirty it all up.
5. I don’t know if it’s referenced in this post, but to keep the wind down during the colder winter months Britt and I fashioned some roman shade type panels to go in front of the open screen areas…and there are a lot of them on our coop.
6. I’ve also hung a couple of buckets with holes in them (to let the rain run through) on the adjacent run where I put tools that I use to quickly clean things up or keep things in place (e.g., small shovels to remove poop from the nesting box, nails/tacks to keep the panels from blowing around on particularly blustery nights, etc.). This makes it a ton easier…and more likely…for me to do what I need to do on the fly.
7. When we first built our coop we didn’t have access to water immediately outside of the coop area. This made providing fresh water really a pain. So fairly soon after building our coop I made the investment to run a new spigot right next to the storage shed. That’s changed my life.
8. Lastly, during the first year or so we didn’t have a light source for our coop area…which limited us to being down by the coop enjoying our ladies or taking care of them to the daylight hours. So I eventually added string lights (and I could because I have an outlet inside our storage shed) to the entire coop area (https://redeemyourground.com/let-light-string-lights/). This has really extended both the functional and aesthetic value of our entire chicken coop area…aka “Scott Family Farm”.
That’s all I can think of for now. Thanks again for the question Kathy…it really got me thinking…and I think you’re right, could be very helpful to other readers!
Take care and Happy Thanksgiving to you and your family too!
– Doug
Hi Doug,
Thank you for your thoughtful reply. Your design could work really well here in San Diego as our winters are mild. Have you had any issues with predators?
Take care,
Kathy
Hey again Kathy! I’m glad you found what I wrote in my reply helpful…AND that our coop design could work for you in San Diego. By the way…I love San Diego…and am jealous of your near-perfect-near-year-round weather!!!
As for issues with predators…short answer is “no”. Speaking from the perspective of our coop, absolutely not. And I think that has to do w the design and materials we used: 1. hardware cloth on the bottom 4′ of the coop and run; 2. hardware cloth down 12-18″ on all sides of both structures; 3. hardware cloth below the “floor” of both structures (i.e., floor = dirt); and 4. using either hardware cloth or plywood to cover the gaps b/w the walls and eaves of the roof. No predator has ever gotten in…and I have seen evidence of them trying to dig in a number of times. We have also had a few hawks dive-bomb into the sides of the coop or run…only to bounce back dazed and confused. So there’s that.
Now, outside of our coop we have had 2 hens killed during some unsupervised free-ranging…by either a possum, raccoon, or feral cat. But that’s the risk you take by letting them spread their wings outside the coop/run.
Alright…I hope all that helps and wish you well on all your chicken-raising endeavors. Please reach out again if you have any other questions.
Cheers,
D.
Hi! We live in the Franklin, GA (Heard county) area. We are just starting to think about chickens and love your design. My husband and son want to build it. Do you have a list of materials anywhere that I’ve missed? Also do we not need a henhouse this far south? I don’t want my girls to freeze in the winter!
Hey Whitney…thanks for reaching out fellow Georgian! And thanks for your kind words about our coop. Unfortunately I don’t have a materials list for our coop. When we built it I hadn’t started blogging yet and didn’t think about keeping track of everything. So sorry. That said, hopefully the drawings you can find will give you…your husband and son…a heads-start. And as long as you have a place your hens can get out of the wind and rain you should be good to go…i.e., regardless of where you live I wouldn’t recommend keeping them in an open run.
Thanks again for reaching out and good luck with your chicken-raising endeavors. Reach out again if you have any questions…and I’d love to see pics of what y’all end up doing.
Take care,
D.
Doug, your coop is beautiful and your site so helpful. Thank you for being willing to share what you’ve learned! We’re about to begin building our coop. Would you be willing to share pictures and information on how you made the shades for the wind? Thank you!
Hey Tami…thanks so much for reaching out with your questions and for your kind words. Sorry that I’m just getting back to you, I’ve been down and out with the flu…YUCK! Anyway…sure I’ll be more than happy to share w you about the shades we made for our coop. And if I can find some pics of when we first made them, I’ll send them your way. If I can’t I’ll take some new ones, I’d just be embarrassed to show you what they look like now at the end of the our season of using them (they get pretty nasty…dirt & mildew…but they still do the trick).
Here’s a bit of supporting info:
– We simply used canvas drop-cloths from the painting department of Home Depot.
– We cut them to the size of the areas we were wanting to cover…wanting to optimize using the hems already sewn into the drop cloths, and allowing enough extra material to create new hems on the new edges…otherwise they would likely unravel…and leaving enough length so that they can be wrapped around and stapled to the 1×2 that is hung above the windows…see below.
– Then Britt sewed the new hems.
– I cut 1x2s the length of the width of each window and canvas panel…wrapped the panel around it and stapled it in place on the backside.
– Hanging was fairly basic…placing the 1×2 where I wanted it…so that the panel came out over the 1×2, I got “under” the panel and screwed it into the coop (outside)…using as many screws as needed given the size of the panel. I screwed it in “under” the panel, so that it would hang in front of the screws.
– To have something to hold the panels up when I don’t want them down, also “under” the panel I tacked a 1′ piece of twine w a loop on the end. Then when I raise the panels, I simply loop that string around another tack or nail placed on the top of the 1×2. For the smaller panels I only need 1 twine/loop deal…for the larger ones, I use 2.
I think that’s it. Then, every year after I’m fairly certain that we’re not going to have any more freezing weather, I’ll simply unscrew each of the panels and store them. This year, I may take them off the 1x2s and wash & hang dry them. Again, I’ll look for some pics and send your way.
I hope this helps and reach out with any other questions you might have.
Take care,
D.
Great Coop! My question is about how many chickens your coop would typically hold? Thanks, David.
Hey David…thanks for reaching out! I’m glad you like our coop…we do and so do our “girls”. As for size of coop her chicken…the standard rule of thumb is 4sf of inside space and 10sf of outdoor/run space. The the area for my chickens in my chicken coop | bunny hutch is about 50 sf…but if you’re using it for chickens only it’s 77sf. This would theoretically allow me to have 12 and 19 chickens respectively. There are other factors you should consider…like the breed/size of chickens, etc….but that should give you an idea. That said, I currently have 7 hens…and that feels right to me.
I hope this helps…and please reach out if you have any other questions. Thanks again and take care, D.
Could you provide a detailed materials list?
Hey Nina…thanks so much for reaching out about our chicken coop. Unfortunately I don’t have a detailed materials list. At the time we built it writing a blog wasn’t even a thought…so I didn’t think about keeping track of everything. Sorry about that. Hopefully the drawings and the blog post will help in some way. Thanks again for reaching out and good luck with everything. Take care, D.
Hi! I love this coop! I am currently investigating the best one to build for my home and I was wondering, what do you do to keep the girls warm when it gets cold outside? Your coop looks really open.
Hey Jackie…I am so sorry that I’m just responding to your question about our chicken coop..it’s been a crazy few weeks.
First of all, thanks so much for reaching out and your kind words about our coop. As for how we keep our girls warm when it’s cold outside, I’ve generally answered that question here: https://redeemyourground.com/raising-chickens-ii-answering-questions/.
I’ll either send you an email with a pic or two or our “roman shade” solution…or see if I can figure out how to post them in the comments section. So look for that.
You might also find the following links from my friend Lisa Steele on FreshEggsDaily.com on caring for chickens during the winter helpful:
http://www.fresheggsdaily.com/2013/11/homesteading-in-winter-cold-weather.html#more
http://www.fresheggsdaily.com/2012/10/cold-weather-prep-winterizing-your-flock.html#more
http://www.fresheggsdaily.com/2012/01/to-heat-or-not-to-heat.html#more
http://www.fresheggsdaily.com/2014/12/20-cold-hardy-chicken-breeds.html#more
I hope this helps. Please let me know if you have any other questions and I’ll try to be quicker in my response next time.
Take care, D.
Love love love your chicken coop design and your blog.
Suzanne…thanks so much for reaching out AND for your kind words about our chicken coop and blog! They are both a labor of love…so your encouragement means a ton. I hope you have a wonderful week and I look forward to potentially hearing from you again! Take care, D.
Really love your coop and are currently constructing one of our own using yours as inspiration.
I had a question about the roof – is there plywood underneath the tin? Did you run a center ridge board or just nail the rafters together?
Thanks!
Hey Graham…thanks for reaching out and for your kind words about our coop. As for the roof…no, no plywood underneath the tin; however, we did put 1x2s perpendicular to the rafters that we nailed the tin to. Yes, there is a center ridge board that the rafters are nailed to. I just took a pic…I’ll email it to you. Please reach out if you have any other questions. Thanks again…good luck…and please send me pics of your final creation. Take care, D.
Hey Doug,
I hope all is well. My wife absolutely loves your coop and she want me to duplicate it. Did you comply an item or product list of all the components for the build out? In addition I would love to see some internal pics of the coop and it’s compostion. Anything will help amigo. Thanks for the time and consideration. Have a great night!
BB
Brandon…
I am so sorry to just be getting back to you on this. Your comment slipped through the cracks. Unfortunately I did not compile an item/product list. When we built our coop we had no idea that we’d be writing a blog. Sorry about that. That said, I don’t know if you saw our Chicken eBook that has a ton of info…most of which is already included in one of the many posts…but it may be nice for you to have it in one place. Here’s the link: https://redeemyourground.com/chicken-ebook-is-here/. I’ll also email you a few pics of it under construction that may help you figure out what we used.
Thanks again and please reach out again…I promise it won’t take so long for me to get back with you.
Cheers,
Doug
Hi Doug,
I love your coop. I have someone that’s going to build a chicken coop for me. Can you email me a few pics of it under construction that may help him figure out what you used? Interior pictures?
Hey Cathy, Thanks for reaching out and for your kind words about our coop. We love it…and so do our Ladies. Sorry for the delay in getting back to you…it’s been a busy time of year with the end of school and summer vacations…oh, and not to mention work!!! Anyway, yes, I will try to email you some pics later this week that you might find helpful. Take care, D.
Thank you for taking the time to share your project. I have 6 spoiled chickens but having problems with a muddy run. I may have missed it but what did you use on the ground? Going to build a new coop and run this summer and going to use some of your ideas. Thanks again. Kim
Hey Kim, thanks for reaching out. And funny you should ask … because I just cleaned out our nasty chicken run last weekend! That said, no matter what you put down in your run, it will still be muddy and stanky at times. But there are things you can do to help minimize all of that.
To answer your question directly – I use wood chip based mulch in my run (not my coop … I use pine shavings there. I find that my chickens like to scratch around in it, it stays drier and is easier to clean than most other options, and it lasts longer. Mulch is a pretty generic term, so that’s why I specified wood chip based mulch. I don’t use grass clippings or pine straw, both of which are sometimes referred to as mulch. (NOTE: It’s NOT recommended to use CEDAR mulch, as it may be harmful to your ladies.)
Regardless of what you use on the floor of your run, the most important thing to do is to keep it as dry as possible. So make sure that water doesn’t drain into your run and that whatever water gets in there that it drains out quickly. That’s all about grading in and around your run – making sure that there’s never standing water. Also, placement of your run is important too … a run in a well-ventilated sunny spot will be dryer than a shady corner or your yard backing up to a privacy fence.
The other thing that I do in my run (and coop) periodically is … when the girls are out free-ranging I dust it with food grade diatomaceous earth (DE). Not only does it absorb moisture and helps eliminate smells, it’s also a natural way to kill bugs and parasites (e.g., mites).
Here are a couple of posts you might find helpful: https://mybackyardlife.com/is-mulch-safe-for-chickens/, https://www.timbercreekfarmer.com/fix-muddy-chicken-run/.
I hope this helps … and please reach out if you have any other questions.
Take care, D.
Thank you for your response. Actually I’m using the same thing you are inside and out. I know I have a drainage problem but for some reason there is no grass growing there like in the past and it is muddy under the mulch (chips ). Have you ever tried sand in the run? The weather is suppose to be nice next week so I may start building on a different sight and see if I can do something to get this sight to grow some grass. Thank you again for your help. Kim
You’re welcome. No, I’ve never used sand … although in principle it does drain well, which is a good thing. If your run stays wet because you just get a good deal of rain (vs. drainage issue…which sounds like what’s going on), you could consider putting a roof over the run or at least part of it.
Take care, D.
Yes it really could use a roof. That’s what I’m fixing to do. Thanks. Kim