Our Chicken Coop Design (Part 1 of 2…err 3)
Given the frequency of posts about our feathered ladies, I know some of you may think my life revolves around our chickens. Well I assure you that’s not the case…but they do add quite a bit of texture to my family’s life. But with that…I do have yet another post on our chickens…and this time it’s because a number of you have asked about our chicken coop design. So here it is…well at least Part 1. Today’s post will include an overview of the entire “chicken space” and the “floorplan” of the coop. Part 2, which will come next week, will contain more detail on the exterior views. So please check back in next week.
![]()
We realize that our chicken coop is not the average chicken coop…particularly in a suburbian neighborhood. But when I sat down to design it, besides wanting to accomplish all the obvious functional objectives, I also wanted to make sure that the entire space that we created was one that we would want to hangout in. We wanted it to not only go with the rest of our home and landscape…style-wise, but that it also had a cozy feel – embracing the fact that it’s not a very large space…about 25′ x 35′. That said, you don’t have to go to the lengths that we did. You can still have a really cool, attractive space…you just have to be intentional about it.
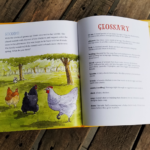
Bird’s-eye View of Scott Family Farm
The featured drawing and the one below are a bird’s-eye view of the entire “Scott Family Farm” (SFF)…err, our side yard. You’ll see that I’ve gone ahead and drawn both the current and future elements. Currently on SFF you’ll find: the chicken coop/bunny hutch, chicken run, and tool shed. And this year, I hope to add a potting bench with a rain barrel and a dining / hangout area with banquette seating – that will also serve as a screen. I’ve already created the outline where these spaces will live…I just have to find the time to build the different components. Not drawn, but I also plan on adding a few strands of string lights to both: 1. provide functional lighting when we check on the chickens at night; but also, 2. create a cool vibe when we’re hanging out in the eventual dining space.
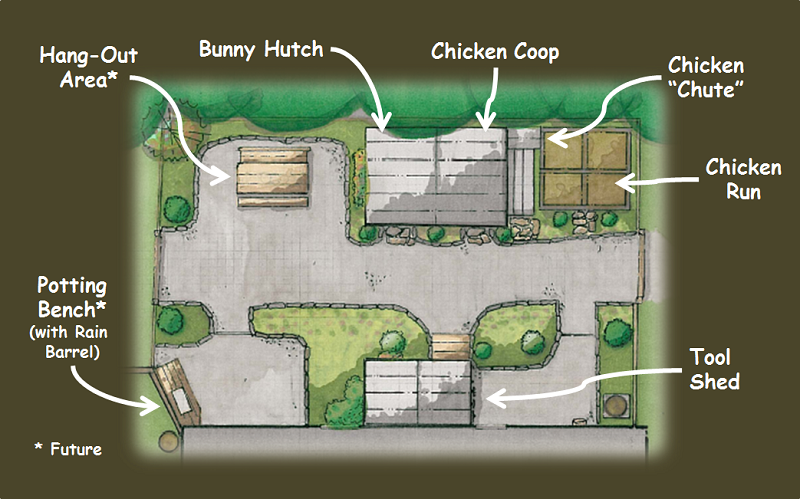
Note, in order to cut down on the amount of mud and dirt that we’d have to walk through to get to the coop (and drag into the house), I’ve essentially covered the entire area with pea gravel…all but the foundation plantings. It’s edged with granite rubble strips to keep everything in place. Having mostly rocks on the ground also made the space around the coop less attractive to the chickens to scratch up and forage in while they are free-ranging…essentially directing them to “greener pastures” in other areas of our yard. I’ve found that as long as you give your chickens a good deal of variety they keep moving about and don’t really decimate any one particular area…that is except for ground covers (e.g., they love creeping jenny) and new growth of about almost anything they can reach. Which is why I’m having to devise a plan for their free-ranging this spring.
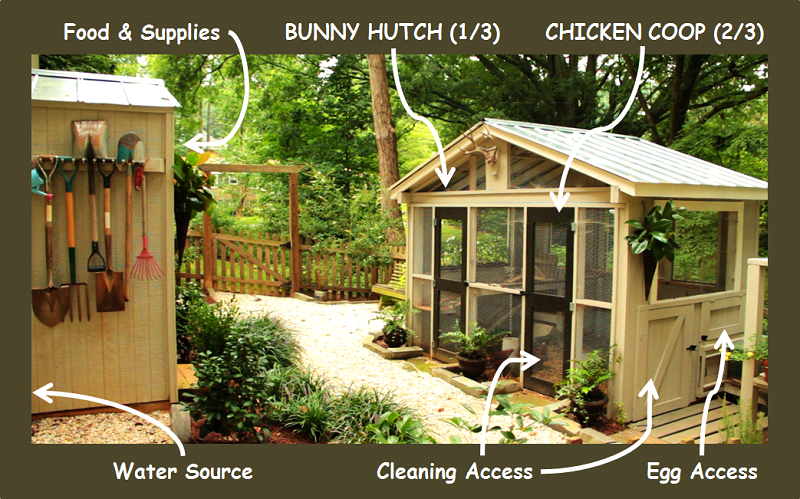
I’ve borrowed an image I used in a previous post (or 2) that shows SFF as it is now and indicates some of the primary functionality you’ll want to include when considering a home for your chickens. Looking at this may also help you orient yourself while studying my drawings.
The Coop “Floorplan”
Clearly I am not an architect, but hopefully this sketch will give you a good idea of our coop’s “floorplan”.
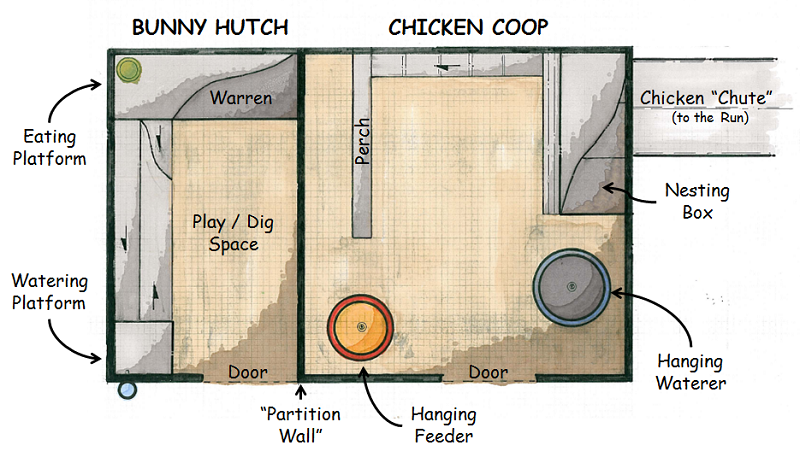
- The overall / coop dimensions is 7′ x 11′.
- The structure is primarily supported by a 6″ x 6″ post at each corner, sunk 2′ into the ground…set in Quikrete, and 2′ x 8’s at the base and 2′ x 6’s at the top. The rest of the structure is made of 2×4’s.
- We chose to have a dirt foundation (i.e., no bottom…vs. wood or concrete)…with hardware cloth sunk 12″-18″ down on all sides (the variation is a function of the slope we’re dealing with on this spot) and then more hardware cloth laid across the bottom before it was back-filled with dirt – all to keep critters from digging in (which we’ve been successful at doing…so far!).
- The left 1/3 serves as the bunny hutch (or where we isolate sick hens…bringing our bunny, Belle, to her inside hutch when we do); separated from the chicken area by a “partition wall” made of chicken wire…attached to 3 2×4’s – bottom, middle, and top.
- The interior of the bunny hutch includes: a lounge / eating / creek-viewing platform at window level…and the enclosed “warren” underneath; a watering platform; and a play / dig space on the bottom…all connected by a series of ramps.
- The other 2/3 serves as the chicken coop.
- The interior of the chicken coop includes: a nesting box enclosure (with 3 nesting boxes…although they only really use one at a time, i.e., all of our eggs are typically in one nesting box) – which is raised off the ground about 18″ so the chickens can have access to the “chicken chute” (see 3 bullet points below); a perch; a hanging feeder; and a hanging waterer.
- The roof is tin. To keep critters from climbing through the top of the coop (where 2×4 rafters create a gap when resting on the walls), I simply added a board to box in the eave. I could have used wire instead, but I had extra wood and I thought wood would be easier to work with than either hardware cloth or chicken wire.
- The chicken coop is connected to the run by a 2′ x 3′ “chicken chute”. There’s a door that closes off the chute from the coop that I initially closed every night and opened every morning – but that only lasted about 3 months…now I leave it open at all times.
- The separation created by the “chicken chute”…between the coop and run, gives me ample room to get to that side of the coop to: 1. get our eggs through a “hatch” door opening into the backside of the nesting box (above the chute); 2. gain access through a door on the bottom 1/2 of the wall and to the left of the chute/egg hatch; and 3. to look into the coop through a large window above both the 1/2 door and chute/egg hatch. I used decking (painted the same color as the coop and run supports) as a walking platform…again, to minimize the amount of dirt we’d drag into the house. (Much of this will be described more in Part 2.)
- The chicken run (shown in the top drawings) is approximately 6′ x 6’…and is simply constructed of 2×4’s – with 4′ x 4′ posts set in Quikrete at each corner . There is hardware cloth along the bottom 1/2 of of the run walls (also sunk about 12″ into the ground) and chicken wire around the top 1/2 of the walls and on the “roof”. I used hardware cloth on the bottom 1/2 to keep critters from digging in…but it’s almost 4 x’s as expensive as chicken wire, so I used chicken wire everywhere else (and for the “partition wall” between the hutch and the coop).
![]()
So there you have it…Part 1 of 2 on the design of our chicken coop. Next week I’ll provide greater detail on the exterior views…which will help clarify some of the more important access issues. For those of you who asked me for our coop’s floorplan, I hope you’ve found this helpful.
If you’re considering building a coop and have any questions, please don’t hesitate to reach out. I’d love to help you in any way that I can.
Take care,

PS: Here are the links to Part 2 and Part 3 of Our Chicken Coop Design…and the link to the video we produced to introduce our ladies to the world.
![[VIDEO] Introducing…Our Backyard Chickens!](https://redeemyourground.com/wp-content/uploads/2015/02/Video-Introducing-Our-Backyard-Chickens-RYGblog-150x150.png)


If you're not already subscribed to RYG and want to get periodic updates, links to new posts & other ground redeeming info ... just enter your email address below. Easy as that!
Really enjoyed reading this and seeing a bit more of the “how.” I’ve been toying with the idea of designing our backyard (which is huge) into intentional spaces. Looking forward to the second installment of this post, and wishing you were in Denver so I could show you what I’m working with and get your feedback!
Thanks Todd. Reach out when you want to bounce something off of me…and I’m certain we could figure out a way to connect long-distance…would be glad to. Just say the word. Take care, D.
Do you remember the name and size of the pea gravel? I really like the color!
Thanks Erika. Yes…our pea gravel near the chicken coop is white and #7 (1/4″). Wanting to try other things out, we also have brown #7 pea gravel around our veggie garden…and mini-slate chips around our fire pit. Let me know if you’re considering among options and I’ll throw out my opinion. Thanks again Erika for reaching out. Take care, D.
What a beautiful coop! Love your site–I’m so glad I found it! I have a couple questions for you, and I hope you can help. I live out in the country in the desert southwest where it’s very hot and humid in the Summer and cool in the Winter. Do you have any suggestions as to what types of plants to grow around the chicken coop? Also, any ideas on how to keep the chickens cool in the Summer and warm in the Winter? I read about your drop cloth idea, but I’m not sure that’s enough for our area. It can get up to 120 degrees in the summer months and as low as 40 degrees (and very windy) in the winter months. Thanks!
Taryn:
Thanks so much for reaching out…and your really kind words…and I’m sorry it’s taken me a couple of days to get back with you.
Not being from the desert southwest I had to do a little research. But here’s what I’d suggest/found out:
1. Plants…again, not being familiar with the area, I can’t really comment specifically on what exact plants to use. But in general, here’s what I have done/discovered: a. I use a good number of potted plants near my chicken coop…although they don’t leave them along completely, being up off the ground a bit, makes them a little less attractive. b. My chickens tend to gravitate to plants that have softer leaves…as well as those that tempt them because the dangle about. So I stick with plants w coarser/harder leaves…and have abandoned having “spiller” plants in my pots. c. I’ve also had success at transplanting more mature plants near my coop…specifically camellias, sweet tea olives (which also combat the smells when in bloom), and azaleas. With the exception of eating a few newer leaves that are within reach, they’ve left them relatively alone. d. In addition to the potted plants, I also have a couple of window boxes…where I will occasionally plant herbs and other sweet-smelling plants. That said, I’ve heard of some folks who say they hens will fly up to roost in and eat whatever is in their window boxes. Maybe my ladies are lazy, but that’s never happened with me. e. I also leave some of their prime scratching areas alone…which is where they typically run first to scratch for worms and bugs.
2. Weather…Again, I don’t deal w the type of weather you do, so I’d simply be telling you what I’ve read. That said, in addition to making sure that that the home you provide your hens appropriately takes into consideration your climate, you also want to make sure to choose chickens that are known to be tolerant in your climate. Beyond that, let me suggest you go to the following posts I found from one of the very first places I go to find out about anything “chicken”…Lisa Steele’s Fresh-Eggs-Daily site (http://www.fresheggsdaily.com/). Here are 3 posts there you might find helpful: http://www.fresheggsdaily.com/2015/02/20-heat-hardy-chicken-breeds.html
http://www.fresheggsdaily.com/2012/03/beating-heat.html
http://www.fresheggsdaily.com/2012/07/hot-weather-acidosis-and-homemade.html
In addition to these posts, here are 3 others you might find helpful:
http://www.backyardchickens.com/t/285417/how-do-you-keep-chickens-cool-in-the-desert-southwest-summer
http://blog.mypetchicken.com/2012/03/28/hot-breeds-for-hot-climates/
http://archive.azcentral.com/home/articles/20130117tips-how-to-raise-chickens-home-organic-eggs.html
I hope all of this helps. Please reach out again if you have any other questions.
Take care,
Doug
(PS: Please pardon any typos above…Britt is calling me to dinner, so I gotta go!)
Oh, wow! Thank you so much for doing all that research. The help is very much appreciated! 🙂
My pleasure…and check back in from time to time for other chicken-related posts. I’ll also be doing a post on the container plants I’m doing this Spring…2 of which are the window boxes I have on our coop and potting shed…just across from the coop. Thanks and take care Taryn, Doug
Aloha, We live in hawaii and are building our coop. I love yours and the info you share. It has been very helpful. Also inspiring to our kids who love our new chickens.
I wanted to find out how you built your doors for your coop. they look very nice and clean and trying to figure out how you constructed them. Any tips? or do you have any detailed plans besides what you posted in part1,2,3?
Thanks!
Chris
Hey Chris…and Aloha to you too! Thanks so much for your kind words about our chicken coop…really appreciate it. I love hearing other families getting into having backyard chickens…and dads wanting to inspire their kids! Man…at the end of the day, that’s what it’s all about…well, at least in my humble opinion. Now…to answer your question about our doors…
Unfortunately, what you found in my posts is all I have to share officially; however, I’ve filled in some of the “door” blanks below.
It’s actually quite simple: 1. take a 3/4″ piece of plywood, cut it to size and cut out the holes; 2. do the same thing w a 1/2″ piece of plywood; 3. cut your hardware cloth to size; 4. sandwich the hardware cloth between your 2 pieces of cut plywood…after putting some wood glue in between; 5. screw the 2 pieces of plywood together…from the exterior side; 6. since you won’t likely find screws short enough, you’ll need to saw off the screws flush w the inside of the door; and 7. paint w exterior paint.
Then it’s just a matter of hanging the door: 1. We used 3 zinc self-closing door hinges…which helps keep the chickens inside…closing the door slowly when your hands are full…and they will be often; 2. For the “doorknob” we simply used your standard self-locking gate latch; 3. we created the door jamb (just on left & right sides) with 1″x2″ strips; 4. so that I wouldn’t get locked in: a. I drilled a 1/2″ hole just above the latch; b. attached a thin chain (not a string) to the latch; c. threaded the chain through the hole; and lastly d. I tied the string I had originally used (unsuccessfully) to the inside side of the chain…with a washer tied to the other end of the string so that the chain would never get pulled all the way back through the hole.
Maybe more than you wanted to know…but that’s what I did. But in case you wanted even more, I just took some pics that I’ll send to the email address you used. Please let me know if I can help in any other way.
Oh…and by the way, I’m in the process of pulling together a printable piece that basically has all the chicken and coop-design related posts pulled together in one place. I’ll be posting that in the next week or so…so check back in if you’d like to grab one for yourself…or if I think about it, I’ll just send it directly to you. You’ve probably seen it all already if you’ve read most of my posts…but you might like to simply have it all in one place.
Take care,
Doug
I am new to Chicken coops and raising hens. We are considering starting our own little flock but want to make sure we are well-educated first. Thanks for showing off your gorgeous coop.
My question is: I have learned how important it is to keep their bedding and “litter” dry for health reasons, but also for smell reasons. I love how open your coop is with all of the open chicken wire – this will be great for airing out any kind of smell. However, I am curious, how do you keep it all dry when it is rainy out? thanks!!!
Hey Sarah…thanks for your reaching out…and it was good timing, I just happened to be at my desk. First, thanks for your kind words about our coop…we love it, as do I think our girls.
You raise a good question. Given that our coop is very open you might think that we would have a problem w rain getting in. However, given where it is located, we do not. The primary elevation that’s almost completely exposed (the front) is within 12 or so feet from our 2-story home…which pretty much blocks the prevailing wind from blowing any rain into the coop. Any rain that does get in dries out quickly. The other 3 sides have windows, however they are higher up and haven’t seemed to pose a problem as far as letting rain in. If I know that it’s going to be a particularly stormy day (or if it’s cold and it’s supposed to be really windy) I do have roman-shade-esque panels made of painter’s drop cloths that I drop down over all of the exposed windows/walls.
That said, you are wise to consider the location of your coop…and how it would be affected by wind, rain, predators, etc.
Thanks again Sarah…and please reach back out with any other questions. Good luck on your new chicken adventure!
Take care, D.
Saw your chicken coop on Country Living…showed it to my wife and she fell in love. I’ve been trying to talk her in to the chicken thing for a while now, and seeing your coop helped. She absolutely loves the way it looks. I love the way it looks too, but I am more of the practical type. I like to know how things work and how they are put together. In looking at your design, I am just trying to figure one thing out. I can’t see the 2×8’s that run along the bottom of the coop. Are they buried under the ground? I am just trying to figure out how the doors are supported. I have a design in my head, and would like to base it off yours…maybe I can share a picture with you after it’s done!
Jason…Thanks so much for reaching out and for your kind words re: our coop. From both a design and functionality perspective it’s worked out really well for us. And yes…I’d love for you to share pictures of whatever you come up with…based on our design or not.
Now, to answer your question. Yes, the 2×8’s are buried under the ground…well actually, due to the grade change they are completely buried in the front (where the doors are) and partially buried on the sides…and would be exposed on the backside. So…the doors aren’t impeded by this base. This keeps things structurally sound, as well as serves as a further impediment for predators to overcome. (BTW, I just had to “do away” with a possum that was trying to dig under the coop yesterday!)
But your question about the doors brings up one thing that I am planning to alter about my design. Since the floor of our coop is dirt (after putting hardware cloth down we back filled with dirt) and I use the deep litter method with pine shavings, I’m constantly having to rake the pine shavings back into the coop. They often obstruct the door from shutting all the way. That said, on the inside of the coop (the doors open out) I plan to nail a 2×6 at the bottom of the door jam to keep the pine shavings in. I don’t anticipate that stepping over a 6″ threshold will be too cumbersome.
Anyway…I hope this helps. Please reach back out if you have any other questions.
Take care,
D.
Doug…thanks a lot for replying. That makes so much more sense to me. I am still trying to decide if I want to have a dirt bottom (great idea on the hardware cloth on the bottom by the way). Or if I want to build the coop on a wood platform. The soil around me here in Virginia is very sandy but wood rots very easily here. I’ll have to get some nice pressure treated wood if I want to build it like yours. I am glad you mentioned adding that 2×6 on the bottom of the door to keep the pine straw in. I will take that into consideration with my design. Oh and about the possum…sometimes you gotta do what you gotta do!
No problem Jason…glad to help. Yes…I used pressure treated would for the structure of my coop/bunny hutch. However, for the interior structures (e.g., nesting box, bunny ramp and warren) I used regular wood. Good luck w your chicken coop…and please do share pics once you’re done. I look forward to seeing it! And don’t hesitate to reach back out if you have any questions along the way. Cheers, D.
Did you use treated or untreated wood to create the coop and run? If untreated what did you seal with? Love the coop, thank you.
Sorry, I just saw Jason’s question about that. But couldn’t find it to delete. Blessings
Sorry for the late reply Laura…but I’m glad that you were able to find what you were looking for. Regardless, thanks for reaching out and for your oh-so-kind words. Take care, D.
Do you have a list of everything used to build this and demensions
Hey Elizabeth, unfortunately I don’t have a list of everything we used. When we built our coop we had no idea we’d one day have a blog where we’d do a post on it…so we didn’t think to be so organized. Sorry about that! If you go to the subsequent posts on our chicken coop designs (https://redeemyourground.com/chicken-coop-design-2/ and https://redeemyourground.com/chicken-coop-design-part-3-3/) you’ll find some of what you are looking for. Or you can download our chicken eBook by going here https://redeemyourground.leadpages.co/leadbox/140638b73f72a2%3A12d93110c346dc/5715999101812736/ and find everything in one place. Hope this helps…and sorry for the delay in getting back to you. Some of the comment inadvertently got spammed. Let me know if you have any questions. Take care, D.
How many chickens fit in your lovely coop?
Hey Gerry, Thanks for reaching out. We use the entire structure for our chickens now (vs 2/3 chickens & 1/3 bunnies)…so at 7’x11′ we have 77sf of floor space in our coop. So at a minimum of 3sf/chicken we could theoretically have 25 chickens. Which seems crazy to me. That said, we’ve had anywhere from 6 to 9 chickens and they love it! I hope this answers your question. Please reach out again if not. Thanks again for reaching out. Cheers, D.
[…] 16. Échangez vos plans de poulailler sans sol […]
[…] Chicken Coop/Bunny Hutch Combo @ Izpirkt savu zemi […]
[…] Συνδυασμός Chicken Coop/Bunny Hutch @ Εξαργυρώστε το έδαφος σας […]
[…] un área y una estación de usos múltiples de la que su gallinero pueda ser parte? Exactamente eso Redime tu tierra lo hicieron aquí con el cobertizo, la estación de jardinería y el gallinero, todos colocados y […]
Glad i found this, we were going to build two different sheds (chicken coop and rabbit hutch)but I like this idea of combing them. We have rabbits and chickens also.
I like the layout and having a place to sit and watch the chickens is one of our favorite things to do
[…] https://redeemyourground.com/chicken-coop-design-1/ […]
Hello!
I love your design but am curious how the openness would work in the winters? Also where do you store feed and other supplies?
Hello again, Mandy! As for the openness of our design, it has really worked well for us. One advantage is great ventilation … good for the ladies’ health, as well as drying everything out! I don’t know where you live, but we live in Atlanta … so our winters aren’t very harsh. That said, when it is particularly cold (and windy!), I have done 1 of 2 things: 1. I have used roman shades of sorts that I drop and secure in front of all the “windows”…open spaces; 2. I have also created panels out of plywood that I have placed in front of the “windows.” There are pros and cons with both, so please reach out if you want to know more. Thanks again for reaching out. Take care, D.
Hello,
I am quite enchanted by your design! Do you have any more details about the bunny side? How you built it and how many bunnies does it hold?
Thank you!
Hey Mandy, sorry for the delay in getting back to you. Spring has sprung!!! Unfortunately, I don’t have anything more than what you have found online. But feel free to reach out with any specific questions. Although we no longer house any bunnies in that section of our coop (we’ve opened it up for our chickens!), we built it for 2. Thanks for reaching out…and again, reach out if you have other specific questions…I’d be more than happy to help. Take care, Doug