The Burlap Wreath | Year’round Door Decor
Since Doug shared what he made for the family Christmas gift exchange this year (a Pallet Board Red Ribbon Star), I felt sure everyone was dying to know what I made. Well probably not, but I’m going to flatter myself and share what I made with you anyway. A burlap wreath! (That probably doesn’t surprise some of you, as you know how I love burlap … I showed you my burlap curtains on a previous post!)
I made my first burlap wreath for myself a year and a half ago and have loved it. I always get lots of compliments on it and it’s just so welcoming on my back door all year round that I thought it would be a great gift to bring to the gift exchange…and it’s easy to make too!
![]()
I know there are so many of these floating around on Pinterest … that’s actually where I was inspired to make my first one. I hope these instructions will make it super easy for you and you will be inspired to not just “pin it,” but actually make it … you could even make it this weekend! It should take you less than 30 minutes and you will absolutely love it!
And you know who else will love it – the birds. Yes, the birds! Before we jump into the how-to’s, I just have to share another reason why I have come to love my burlap wreath.
I had no intention of it being used by the birds, I just liked the way it looked. But since I’ve put it on my back door I have found that the birds in my back yard have found this circle-o-burlap quite useful. There are times when I’ve come out to find pulls in my wreath and strings of burlap dangling … and it dawned on me that the birds were gathering strands of burlap to weave into their nests. Also … on cold nights, I’ve even found a bird snuggled up in my wreath, making it their cozy bed for the night. That just makes me happy … that my beautiful wreath has a greater purpose!
![]()
Okay, so now that you really, really want to make a burlap wreath … here are the instructions of how to make one of your own. And let me just tell you upfront, this is not a scientific process. In fact, you have to set aside all your perfectionistic, type A tendencies, if you have them, and just kind of go with the flow on this one … literally go with the flow of the burlap garland. It’s not an exact science, nor should it be … in my opinion, the variations actually make it more interesting. So you gotta just “roll with it” as you go.
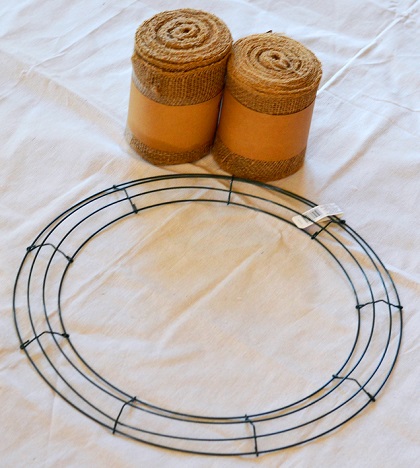 You just need 2 things … both of which should be readily available at your local craft store … but if you want to source online, I’ve provided you links below:
-
- A wire wreath frame – I think the 18” frame is ideal for a standard sized door.
- Burlap garland – takes about 15-20 yards for an 18” frame, if you want a tight look like mine.
Here’s all you do:
-
- First, you want to secure the burlap to the wire form by weaving it over and under through the frame (see Figure 1).
- With the roll of burlap behind the frame, you will start pushing/pulling burlap “loops” up through the frame from the back … starting with the inside row, then the middle row, and then through the outside row (see Figures 2 & 3). The loops on mine are about 3” each, but don’t get caught up on getting them the exact same size – in my opinion, having some variation is one of the things that makes this wreath look so good. Also, be careful when making the loops that you keep them loose and don’t pull too tightly or you will pull the previous loop out.
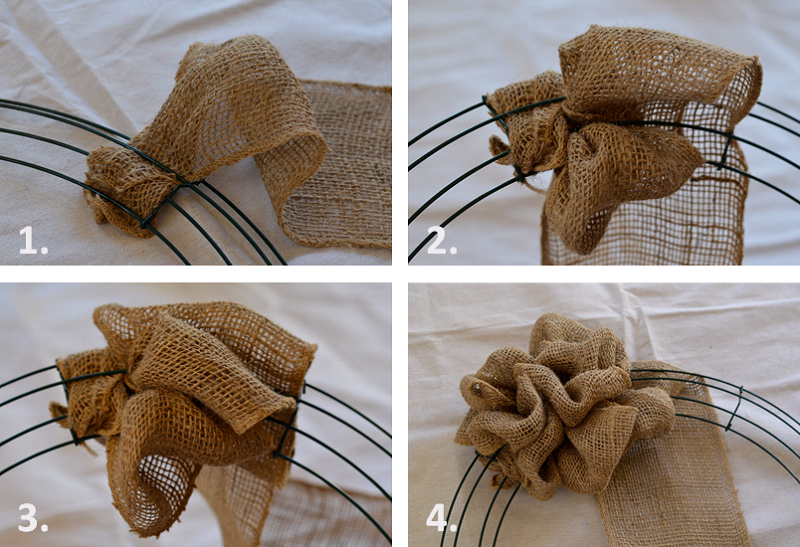
- Handling the long roll of garland is a bit awkward at first. I found it easiest to just pull out an arm’s length of garland to work with and then just let it come off the roll as I needed more. [Note: The roll of burlap will always be behind the frame. All loops are pushed from the back side of the frame and if needed you can help pull them through from the front as well, but the roll needs to always stay behind the frame.]
- When you are done with one set of loops, push it to the side and do it again. I often twist the burlap in the back between some loops and some rows just to give it some tension and therefore less likely to pull out the last loop. You can continue in the same order … inside, middle, outside OR you can alternate and do outside, middle, inside. I tend to vary this depending on what’s working for me at that round. It really doesn’t matter … remember just go with the flow and what’s feeling right to you.
- You will do this again and again and again around the frame. As you go, make sure to push the loops together to make a fuller wreath (see Figure 4). I tend to put 3-4 sets of loops in between the various sections of the frame … but this probably depends on the width of your garland and the size of your frame.
- When you get to the end of your garland or finish the wreath, save a few inches to weave in and out to secure it to the end to the frame … just like at the beginning.
- Easy enough! Your wreath will be done in no time! It can be hung “as-is” or you can add embellishments to your wreath. If you choose to embellish, I would suggest that you attach it with wire (vs. hot glue) so that you can easily change out your embellishments for the different seasons. You’ll find a number of variations on Pinterest that you can copy or inspire you to do something else. As for me, I’ve just kept mine simple … that’s just who I am!
![]()
Well I hope this has been helpful and that you’re inspired to make one for yourself or for a friend. They will thank you … and so will the birds!
Enjoy!

How have you embellished your burlap wreath…or plan to? Please share what ideas you came up with and photos of what you added. Do you have other wreath ideas that would offer good building materials for the birds?
* Note: In case you’re wondering, none of the brands/companies featured in our posts paid us to include their products. They are simply products that we have or would like to have. That’s it. However, in full disclosure, RYG may earn a small commission from qualifying purchases when links take you to Amazon.com. Learn more…
You may also enjoy these posts from RYG ...


If you're not already subscribed to RYG and want to get periodic updates, links to new posts & other ground redeeming info ... just enter your email address below. Easy as that!
Yea!! I’ve had this burlap wreath pin on Pinterest for more than a year, and after reading your blog post, I headed off to Hobby Lobby for my supplies and am proud to say I completed my beautiful wreath this week! Thanks for the motivation, B!! 🙂 It is hanging on our front door, and every time I glance up at it from our great room or as I drive away from our home, I think of y’all. I am loving your blog! Such fun, interesting and inspiring entries! Love you guys!